
A surface scratch on a painted cabinet is more than a cosmetic flaw. It’s a physical breach in the protective coating that can lead to moisture intrusion and further delamination. When seeking professional cabinet refinishing for scratches and chips, the goal is a restoration that maintains the integrity of the original finish. You likely understand the frustration of seeing a visible chip in a high-traffic kitchen, especially when you fear a repair will look like a poorly executed patch job. Matching the exact paint sheen and texture requires a technical approach rather than a quick fix.
This guide provides the procedural steps to ensure a seamless and durable result. You’ll learn the specific criteria used to assess damage depth and the steps necessary to blend repairs invisibly into the existing surface. We provide a clear overview of the professional methods used to restore structural integrity and protect your cabinetry against future chipping. This objective assessment helps you determine when a project requires expert intervention to maintain a factory-grade appearance.
Key Takeaways
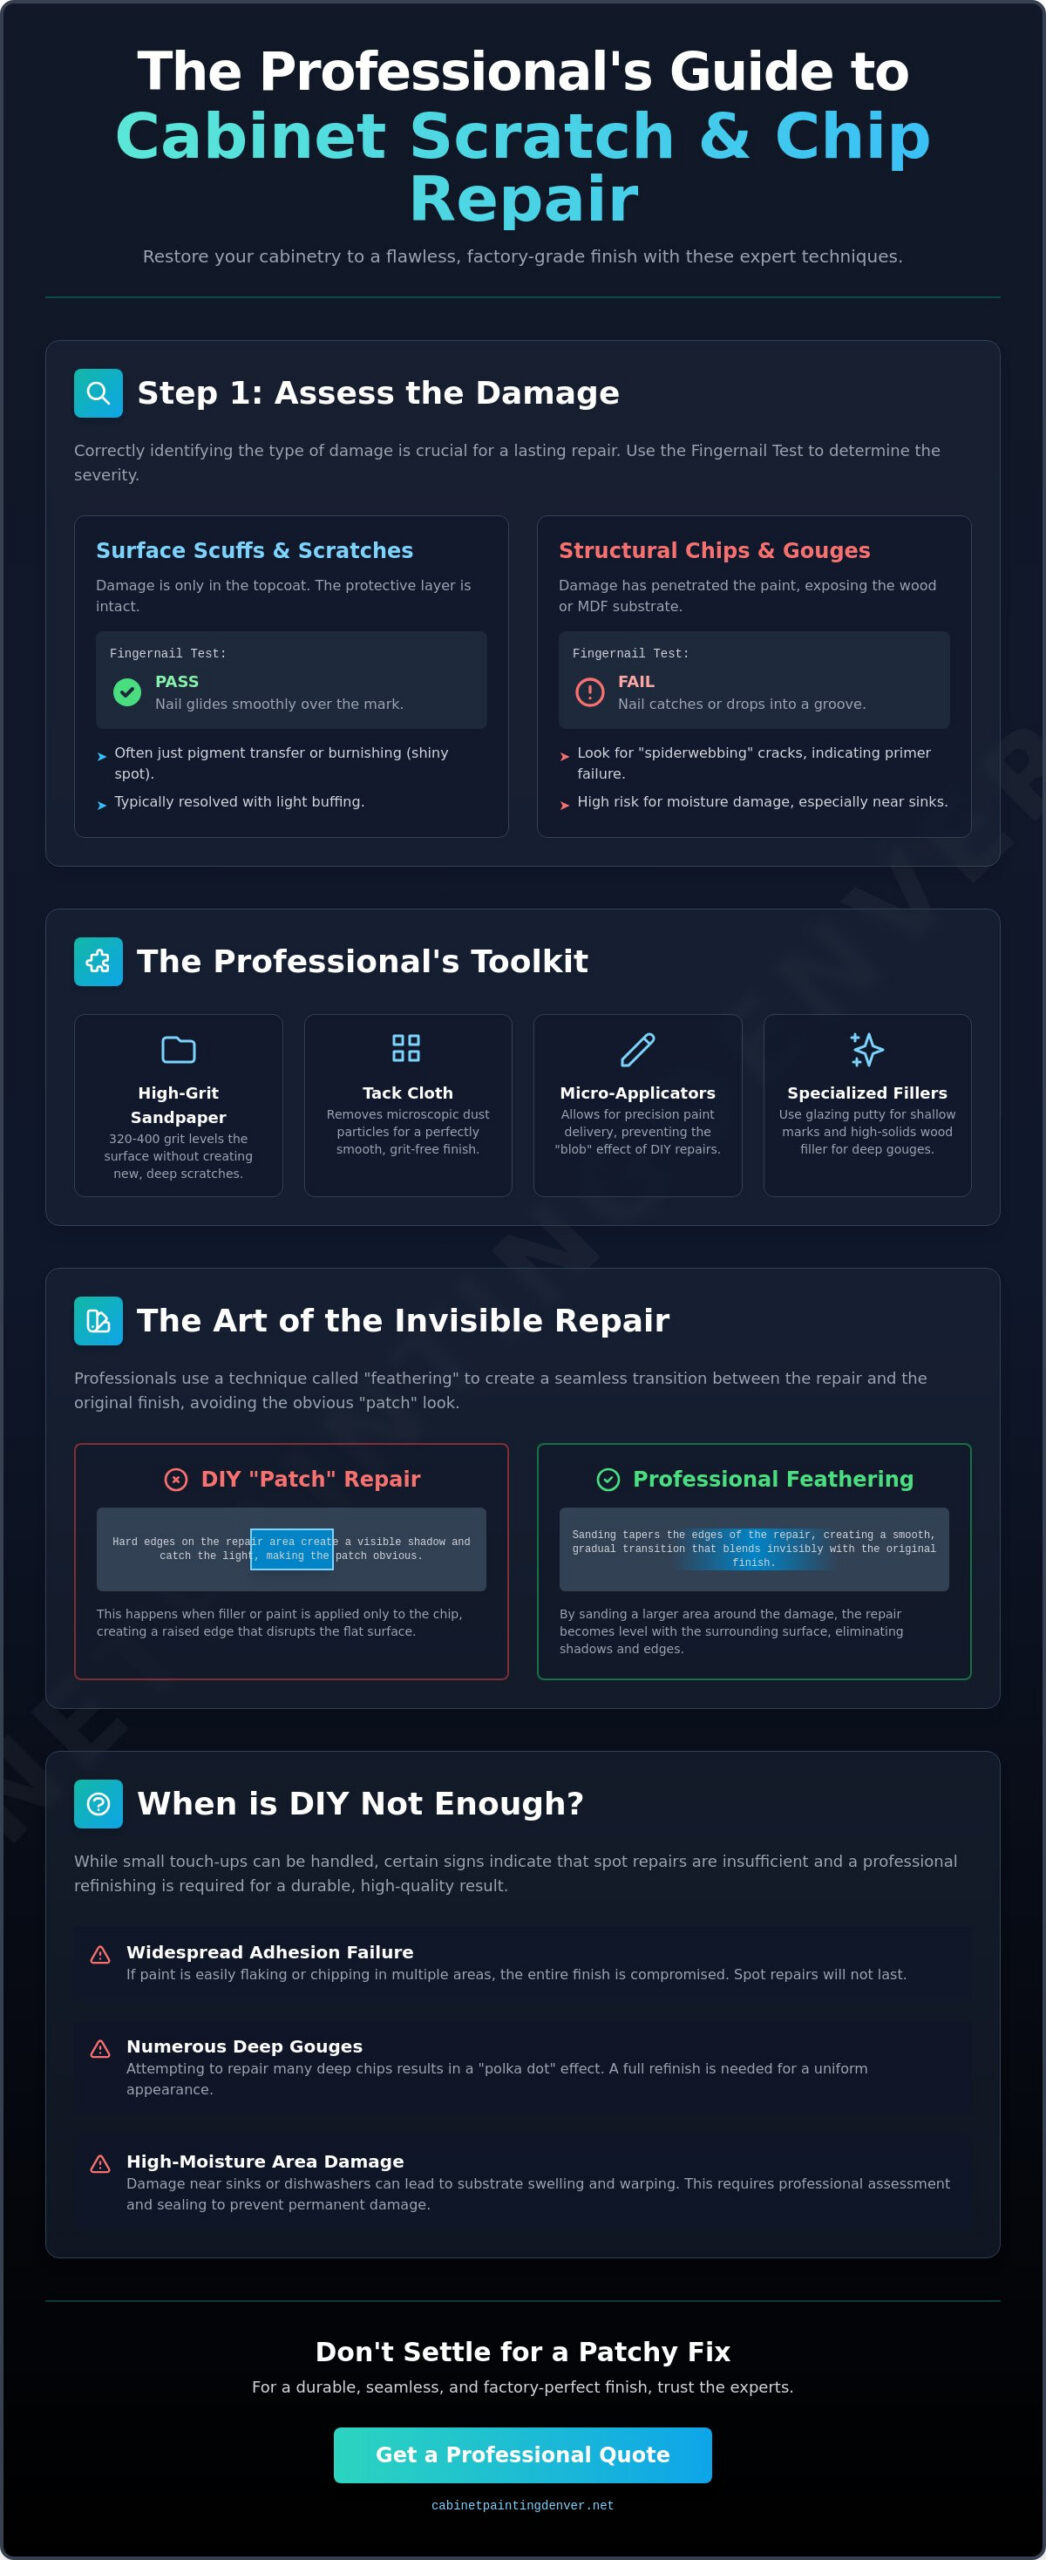
- Learn to use the fingernail test to differentiate between minor surface marks and structural chips that compromise the primer bond.
- Identify the specific high-grit abrasives and cleaning protocols required to create a level, contaminant-free repair surface.
- Discover how the feathering technique in professional cabinet refinishing for scratches and chips creates an invisible transition between the repair and the original finish.
- Understand the impact of light refraction and how to properly taper edges to avoid the common patch job appearance.
- Recognize signs of widespread adhesion failure to decide when spot repairs are insufficient and professional cabinet painting is required.
Assessing Cabinet Damage: Surface Scratches vs. Structural Chips
Accurate damage assessment is the foundation of a successful restoration. Before starting professional cabinet refinishing for scratches and chips, you must determine the depth of the breach. A common method is the “fingernail test.” Run your nail gently across the affected area. If it catches or drops into a groove, the damage has penetrated the paint film. Conversely, if your nail glides smoothly over the mark, you’re likely dealing with a scuff or pigment transfer from an external object. A scuff is merely a surface-level deposit that hasn’t compromised the coating.
Inspect the perimeter of the damage for “spiderwebbing.” These fine, radiating cracks indicate that the original primer bond has failed. This condition often results from impact or thermal expansion. It suggests that the surrounding paint is no longer structurally sound. Evaluating the location of the damage is also critical. Scratches near sinks or dishwashers pose a high-moisture risk. Water can seep into the substrate and cause permanent warping or rot if not addressed quickly.
To better understand how experts evaluate and prep surfaces, watch this helpful video:
Identifying Superficial Topcoat Marks
Superficial damage often affects only the clear coat or the sheen of the finish. Burnishing occurs when a hard object rubs against the cabinet, polishing the matte or satin finish into a shiny spot. These marks create the illusion of a scratch but do not break the paint surface. Because the protective layer remains intact, these areas rarely require structural wood filler or deep sanding. Understanding the basics of cabinet construction and materials helps in identifying how different finishes react to daily wear. Most topcoat marks can be resolved with light buffing rather than a full repaint.
Diagnosing Deep Substrate Gouges
Deep chips are more than visual imperfections. They signify that the MDF or natural wood substrate is exposed to the atmosphere. When the core material is visible, it’s vulnerable to humidity. In many kitchen environments, unsealed wood or composite material will absorb moisture. This leads to swelling that deforms the door profile. A deep chip can also indicate that the entire paint film has become brittle with age. If the edges of a chip are sharp and easily flaked away with a tool, the coating may be nearing the end of its functional life. Professional cabinet refinishing for scratches and chips addresses these structural concerns by sealing the substrate before applying a new finish. This prevents the “polka dot” effect where multiple small repairs fail to blend with the aging original surface.
Professional Tools and Materials for Cabinet Restoration
Executing high-quality repairs requires specialized hardware that goes beyond standard home maintenance kits. Professionals utilize high-grit abrasives, specifically 320 to 400 grit sandpaper, as the industry standard. This fine grit allows for leveling the repair area without creating deep scratch patterns in the surrounding finish. Using lower grits often results in visible sanding marks that the new paint cannot fully hide. Precision is the priority in professional cabinet refinishing for scratches and chips, and the choice of abrasive dictates the final smoothness of the surface.
A zero-dust environment is mandatory for a seamless finish. Professionals use tack cloths to remove microscopic particles that standard microfiber towels miss. Any remaining dust will create a gritty texture once the paint dries. For pigment application, micro-applicators are superior to standard brushes or cotton swabs. These tools feature tiny, non-absorbent tips that allow for precision pigment delivery exactly where it’s needed. This prevents the “blob” effect often seen in DIY repairs, where excess paint builds up around the edges of a scratch. Choosing the right filler is also a technical decision. Glazing putty is ideal for shallow surface marks, while high-solids wood filler is required for deep gouges that have compromised the substrate. Understanding the technical aspects of assessing wood cabinet damage ensures the chosen filler matches the density and expansion characteristics of the cabinet material.
Chemical Cleaners and De-glossers
Surface preparation involves chemical neutralization. Standard dish soap is insufficient because it often leaves behind surfactants or oils that prevent paint adhesion. Professionals use Trisodium Phosphate (TSP) to strip away stubborn kitchen grease and cooking oils. This ensures the repair area is chemically receptive to new coatings. For those planning comprehensive kitchen cabinet painting, this step is non-negotiable. The surface must be clean and slightly de-glossed to create a mechanical bond between the old and new layers.
Matching Paint Sheen and Chemistry
Sheen levels are not standardized across different paint manufacturers. A “Satin” finish from one brand may have the light-reflective properties of a “Semi-Gloss” from another. If the original paint code is unknown, sourcing a matching sample is necessary to avoid visible patches. It’s also vital to match the paint chemistry. Applying an alkyd-based product over a water-borne finish can lead to immediate adhesion failure. Professional cabinet refinishing for scratches and chips depends on this chemical compatibility to ensure the repair remains durable over time. Using the correct base prevents the new paint from bubbling or peeling when exposed to heat and humidity.
Step-by-Step Instructions for Repairing Scratches and Chips
Professional cabinet refinishing for scratches and chips begins with thorough decontamination. Degrease the area with a professional-grade cleaner to remove kitchen oils and surfactants. This step is critical because any residual grease will prevent the new filler or paint from bonding to the surface. Use a clean, lint-free cloth and ensure the area is completely dry before proceeding to mechanical preparation.
Level the edges of the scratch with 400-grit sandpaper once the surface is clean. This process removes jagged edges of the existing paint film that would otherwise create a visible ridge under the new finish. Work in small, circular motions and avoid sanding through the surrounding topcoat. This creates a smooth transition zone for the repair materials.
Apply filler in thin, successive layers to avoid air pockets. Filling a deep gouge in a single pass often leads to internal voids and surface cracking as the material cures. Proper layer management is a core principle discussed in the Utah State University Extension’s Guide to Wood Refinishing; it ensures the repair remains stable over time. Allow each layer to dry fully before adding the next to account for natural shrinkage.
Sand the final layer of filler flush with the surrounding paint film using a light touch. Once the surface is level, apply pigment using a dabbing motion rather than long brush strokes. This technique minimizes brush texture and helps the new paint mimic the original factory spray pattern. Professional cabinet refinishing for scratches and chips depends on this attention to texture to achieve an invisible result.
Managing the Repair in Denver’s Dry Climate
Denver’s indoor humidity frequently drops to levels between 15% and 20%. This low moisture content causes wood fillers and paints to shrink and dry significantly faster than in coastal regions. You should adjust your drying times by waiting at least 30% longer than the product label suggests to ensure the material has fully stabilized. Rapid solvent evaporation in dry air can also cause “flashing,” where the paint sheen appears blotchy. Applying paint in smaller sections helps maintain a wet edge and prevents these sheen inconsistencies.
Layering for Depth and Durability
Follow the “thin-to-thick” rule for deep substrate damage. Two thin coats of paint are always superior to one thick dab, as thinner layers cure more uniformly and provide better adhesion. For the final sanding stage, use a small backing block rather than just your fingers. A block distributes pressure evenly across the surface, whereas finger pressure can create slight depressions or “waves” in the repair. This ensures the final surface is perfectly flat and reflects light consistently with the rest of the cabinetry.
The Art of Blending: Making the Repair Invisible
The final stage of professional cabinet refinishing for scratches and chips involves the technical process of blending. Applying pigment to the repair site is only half the task. You must also manage the transition between the new paint and the existing finish. Professionals use a “feathering” technique to achieve this. By tapering the edges of the new paint outward from the center of the repair, you eliminate the hard lines that create a visible “halo” effect. This ensures the eye doesn’t catch the border where the repair ends and the original cabinet begins.
Managing light refraction is equally important. A repair might look perfect from a direct angle but become obvious when viewed from the side. This happens because the sheen level of the new paint doesn’t exactly match the aged topcoat. To avoid ruined aesthetics, always test your blend on the back of a cabinet door first. This allows you to verify color and sheen accuracy before committing to a visible face frame or door front. Testing on a non-visible area is the only way to confirm how the paint chemistry reacts to the existing surface.
Fixing Sheen and Texture Mismatches
If a repair appears too shiny once dry, you can use a fine abrasive pad to gently dull the surface. A light buffing with a grey scuff pad often brings a high-gloss spot down to a matching satin or matte finish. In cases where the damage is extensive or the color match is slightly off, a spot repair may not suffice. It’s often more effective to perform a full door cabinet refinishing to ensure a uniform appearance across the entire kitchen. Professional HVLP sprayers atomize paint to match factory finishes, eliminating the heavy texture and ridges common with manual brush repairs. If you find that spot repairs are becoming too numerous, you should request a professional cabinet painting assessment to restore the entire set.
Cure Times vs. Dry Times
There’s a critical difference between “dry to touch” and “fully cured.” Most paints are dry within hours, but the chemical cross-linking required for a durable film takes longer. You must wait 7 to 14 days before using aggressive chemical cleaners or scrubbing the repair site. During the initial 48 hours, protect the cabinets from steam and high heat, which can soften the fresh paint and cause it to peel. This patience ensures the repair remains permanent and resistant to the daily rigors of a high-traffic kitchen. If the paint is forced to dry too quickly in Denver’s low humidity, it may become brittle, so maintaining a stable environment is vital for long-term durability.
When to Choose Professional Refinishing Over DIY Repairs
Determining when to stop patching and begin a full restoration is a matter of cumulative damage. If your cabinetry exhibits the “Polka Dot” effect, where multiple repairs distract from the kitchen’s visual flow, spot fixes are no longer viable. Individual repairs often have slight variations in sheen. When these accumulate, the surface looks uneven under artificial light. Another red flag is widespread adhesion failure. If you see peeling or flaking around handles or near the dishwasher, the original bond has likely failed. This indicates that the coating is no longer protecting the substrate.
Hand-painting over a factory kitchen cabinet painting finish presents significant technical challenges. Brushes and rollers leave textures that contrast sharply with the smooth, atomized surface of an original coating. Professional cabinet refinishing for scratches and chips becomes the more cost-effective choice when the time spent on constant patching exceeds the value of a durable solution. A full refinish provides a uniform protective layer that prevents moisture from reaching the core material across all surfaces. It eliminates the cycle of temporary fixes that eventually fail.
The Professional Spray Advantage
High Volume Low Pressure (HVLP) spraying is the professional standard for a factory-grade result. This equipment atomizes the coating into fine particles, creating a finish that DIY brushing cannot replicate. Industrial-grade coatings used by experts provide superior resistance to kitchen oils and heat. These products are significantly more durable than standard consumer-grade paints found at retail stores. A professional cabinet painting denver service also prioritizes comprehensive substrate preparation. This includes clinical-level degreasing and mechanical sanding to ensure the new film won’t delaminate under daily stress.
Next Steps for Denver Homeowners
You should start by requesting a professional assessment of your cabinet’s current condition. An expert can identify if the issues are localized or if they indicate a systemic failure of the previous finish. Before a professional team arrives, clear your countertops and ensure the workspace is accessible. This preparation allows for a more efficient application and a cleaner environment. If your cabinets have more than a few minor marks, contact Cabinet Painting Denver for a professional quote. We provide the technical expertise required for professional cabinet refinishing for scratches and chips, ensuring your kitchen returns to its original factory-grade appearance.
Restoring Your Kitchen’s Structural and Aesthetic Integrity
Maintaining your cabinetry’s finish is a technical requirement for long-term protection. You’ve learned how to differentiate between superficial marks and structural damage using the fingernail test. You also understand the precision required for feathering edges and matching paint chemistry to avoid visible patches. Professional cabinet refinishing for scratches and chips provides the only reliable way to eliminate the “polka dot” effect caused by multiple DIY repairs. When spot fixes no longer maintain the kitchen’s flow, a full restoration becomes the most cost-effective solution.
Since 2026, our team has focused on Denver CO kitchen transformations using professional HVLP spray finishes. These industrial-grade, high-durability coatings offer a factory-quality result that withstands the heat and moisture of a high-traffic environment. We prioritize superior substrate preparation to ensure every finish remains stable and resilient. If you’re ready to move beyond temporary fixes and achieve a seamless look, our specialists are ready to assist. Request a Free Cabinet Assessment in Denver today to restore the lasting beauty and value of your home.
Frequently Asked Questions
Can I use a furniture touch-up marker on my painted cabinets?
You should avoid using furniture touch-up markers on painted cabinets. These markers are designed for stained wood and contain dyes that do not match the opaque pigments of paint. Using them results in a translucent mark that contrasts with the solid color of your cabinetry. For professional cabinet refinishing for scratches and chips, you must use a matching paint sample to maintain color consistency and opacity.
What grit sandpaper is best for fixing cabinet scratches?
The professional standard for sanding cabinet scratches is 320 to 400 grit sandpaper. These fine grits allow you to level the edges of the scratch without creating deep abrasions in the surrounding topcoat. Using a lower grit, such as 100 or 150, will leave visible sanding marks that the paint cannot hide. Always sand in small, controlled motions to avoid removing too much material from the factory finish.
How do I find the original paint color for my kitchen cabinets?
You can find the original color by checking the back of a cabinet door for a manufacturer’s label or contacting the original installer for the paint code. If these records are unavailable, you should remove a small door or drawer front and take it to a professional paint store. They use a spectrophotometer to scan the surface and create a custom match based on the current state of the aged finish.
Why does my cabinet touch-up look like a different color in the sunlight?
This phenomenon is known as metamerism, where two colors match under one light source but differ under another. It often occurs when the touch-up paint has a different chemical base or pigment concentration than the original coating. Differences in sheen also cause light to reflect at different angles. This makes the repair visible in natural light even if the pigment match is technically accurate.
Is it possible to fix a chip on a high-gloss cabinet finish?
It is possible to fix a chip on a high-gloss finish, but it is extremely difficult to achieve an invisible result without professional equipment. High-gloss surfaces show every imperfection in texture and level. You must fill the chip, sand it perfectly flush, and then polish the area to match the surrounding shine. Because of the technical skill required, professional cabinet refinishing for scratches and chips is often the only way to restore high-gloss units.
How long should I wait for cabinet filler to dry in Denver’s climate?
In Denver’s low-humidity environment, you should wait at least 30% longer than the manufacturer’s recommended time for a deep cure. While the surface may feel dry to the touch within minutes, the interior of the filler remains soft. Sanding too early in dry air causes the filler to pull out of the scratch. Allowing 2 to 4 hours between thin layers ensures the material is stable for sanding.
Can I use wood glue as a temporary fix for a cabinet chip?
You shouldn’t use wood glue to fill chips in painted cabinets. Wood glue is designed to bond two pieces of wood together, not to act as a leveling agent or filler. It dries into a hard, brittle state that is difficult to sand and doesn’t accept paint pigment well. Standard glazing putty or high-solids wood filler is necessary to create a paintable, durable surface that won’t shrink or crack.
What should I do if the paint is peeling off in large flakes around a scratch?
Large peeling flakes indicate a systemic adhesion failure between the paint and the substrate. This usually occurs because the original surface wasn’t properly de-glossed or cleaned before the initial painting. Spot repairs won’t be effective because the surrounding paint will continue to fail. In this situation, the cabinets require professional stripping and a full refinishing service to ensure a lasting bond and a uniform appearance.


