
Last Tuesday, a homeowner in Denver spent 14 hours stripping away a “weekend project” because their kitchen cabinets felt like sticky sandpaper just 90 days after painting. They were searching for the secret of how professionals get a smooth cabinet finish, but they found out the hard way that a standard brush simply isn’t enough. You’ve likely felt that same frustration when you notice brush marks or wood grain peaking through your new coat of paint under the kitchen lights. You want a kitchen that looks like a high-end showroom, not a craft project gone wrong.
This guide reveals the exact sequence of 320-grit mechanical sanding and chemical bonding agents used by experts to create a factory-like look. We’ll show you the precise steps to eliminate tackiness and achieve a hard-shell surface that resists grease for years. We’re breaking down the professional transition from basic rolling to advanced HVLP spraying and grain-filling techniques that guarantee a flawless result.
Key Takeaways
- Learn why professional de-glossing and chemical cleaning are the essential first steps to prevent kitchen grease from ruining your paint bond.
- Discover how professionals get a smooth cabinet finish by utilizing a precise progression of sanding grits and mechanical leveling techniques.
- Understand the role of atomization and why high-pressure spraying is the only way to achieve a factory-like look without brush marks or roller texture.
- Identify the chemical differences between standard latex wall paint and the industrial-grade urethanes used for high-traffic cabinetry.
- Explore how local environmental factors, like Denver’s low humidity, can prematurely “lock in” texture if the curing process isn’t managed correctly.
The Foundation of Smoothness: Professional De-Gossing and Cleaning
A professional finish is defined by the total absence of surface contaminants and microscopic texture. When homeowners ask how professionals get a smooth cabinet finish, the secret lies in the 3 to 4 hours of prep work performed before a single drop of paint is poured. Kitchen grease acts as a chemical barrier that prevents a professional bond. Even a 2% residue of aerosolized fats can stop the paint from ever reaching full hardness. This lack of adhesion is why many DIY projects feel “tacky” or sticky to the touch months after they’re finished. Industrial de-glossers work differently than standard household soaps by chemically altering the surface tension of the existing wood finish.
Chemical De-Glosser vs. Manual Abrasion
While sanding is vital, professionals rely on chemical liquid sanders to penetrate the intricate crevices of door profiles. These solvents soften the top 0.5 mils of the factory clear coat, allowing the new primer to fuse with the old substrate. Professionals frequently use TSP (Trisodium Phosphate) because it’s one of the few agents capable of stripping 100% of organic oils without leaving a soapy film. De-glossing is the process of increasing surface energy for better adhesion. Without this chemical transition, the new coating sits on top of the wood like a plastic sheet instead of becoming part of the cabinet structure.
The ‘Kitchen Film’ Problem
Invisible cooking oils are the primary cause of “fish-eyes,” which are small, unsightly craters that appear in the wet paint film. To prevent this, Denver experts utilize a rigorous multi-stage cleaning protocol:
- Initial scrub with a high-pH degreaser to break down surface oils.
- A secondary wash with TSP to neutralize deep-seated contaminants.
- A final wipe-down with 99% denatured alcohol to remove any remaining moisture or cleaning residue.
This protocol is mandatory for 100% of projects, including brand-new cabinets. New wood often arrives from the factory with silicone lubricants or wax coatings used during the manufacturing process. If you don’t remove these factory residues, the paint will peel within the first 12 months of use. Understanding how professionals get a smooth cabinet finish requires acknowledging that the chemical bond is just as important as the physical one.
Mechanical Leveling: How Professionals Get a Smooth Cabinet Finish via Sanding
Mechanical leveling is the foundation of every high-end paint job. Understanding how professionals get a smooth cabinet finish starts with a strict progression of sandpaper grits. Skipping from a coarse 120-grit to a fine 320-grit is a common mistake that leaves visible pigtails under the paint. Pros typically follow a 120-150-220 sequence for raw wood or previous finishes. This 3-step process ensures that each subsequent grit removes the scratches left by the previous one. If a cabinet has a 1mm thick layer of “orange peel” from a previous amateur roller application, starting with 150-grit won’t be aggressive enough; you’ll need a 120-grit baseline to flatten the surface before refining it.
Tool selection defines the final texture. Random orbital sanders are workhorses for flat door panels, but they can’t reach the sharp 90-degree angles of Shaker-style edges. In those tight profiles, hand sanding with flexible foam pads is the only way to avoid rounding over crisp architectural lines. Dust management is equally vital. By 2026 standards, a professional workspace requires HEPA-certified vacuum extraction that captures 99.97% of particles. Without this, microscopic debris settles into the wet finish, creating a sandpaper-like texture that ruins the factory look. Homeowners often find that a professional cabinet refresh provides a level of smoothness that’s difficult to achieve with standard shop vacs.
The Art of Grain Filling for Oak and Ash
Paint is a thin film, not a filler. Open-grain woods like oak and ash feature deep pores that remain visible even after five coats of paint. Professionals use high-solids grain fillers, such as Aqua Coat or Goodfilla, which don’t shrink by the 15% margin seen in standard wood putties. The “sand-back” technique involves applying the filler across the entire surface and then sanding it until it only remains inside the grain pits. This creates a glass-smooth substrate for the primer to bond with.
Sanding Between Every Single Coat
The secret to a mirror-like surface is scuff sanding between every coat of primer and paint. Using 320 to 400-grit sponges, pros knock down “nibs,” which are tiny bits of airborne dust that land in the wet finish. This process also creates mechanical inter-coat adhesion, ensuring the paint layers fuse together. Before the final topcoat, professionals use high-intensity 5000K LED lights to identify “high spots” or drips. Removing these 0.5mm imperfections at the primer stage prevents them from being magnified by the final sheen.
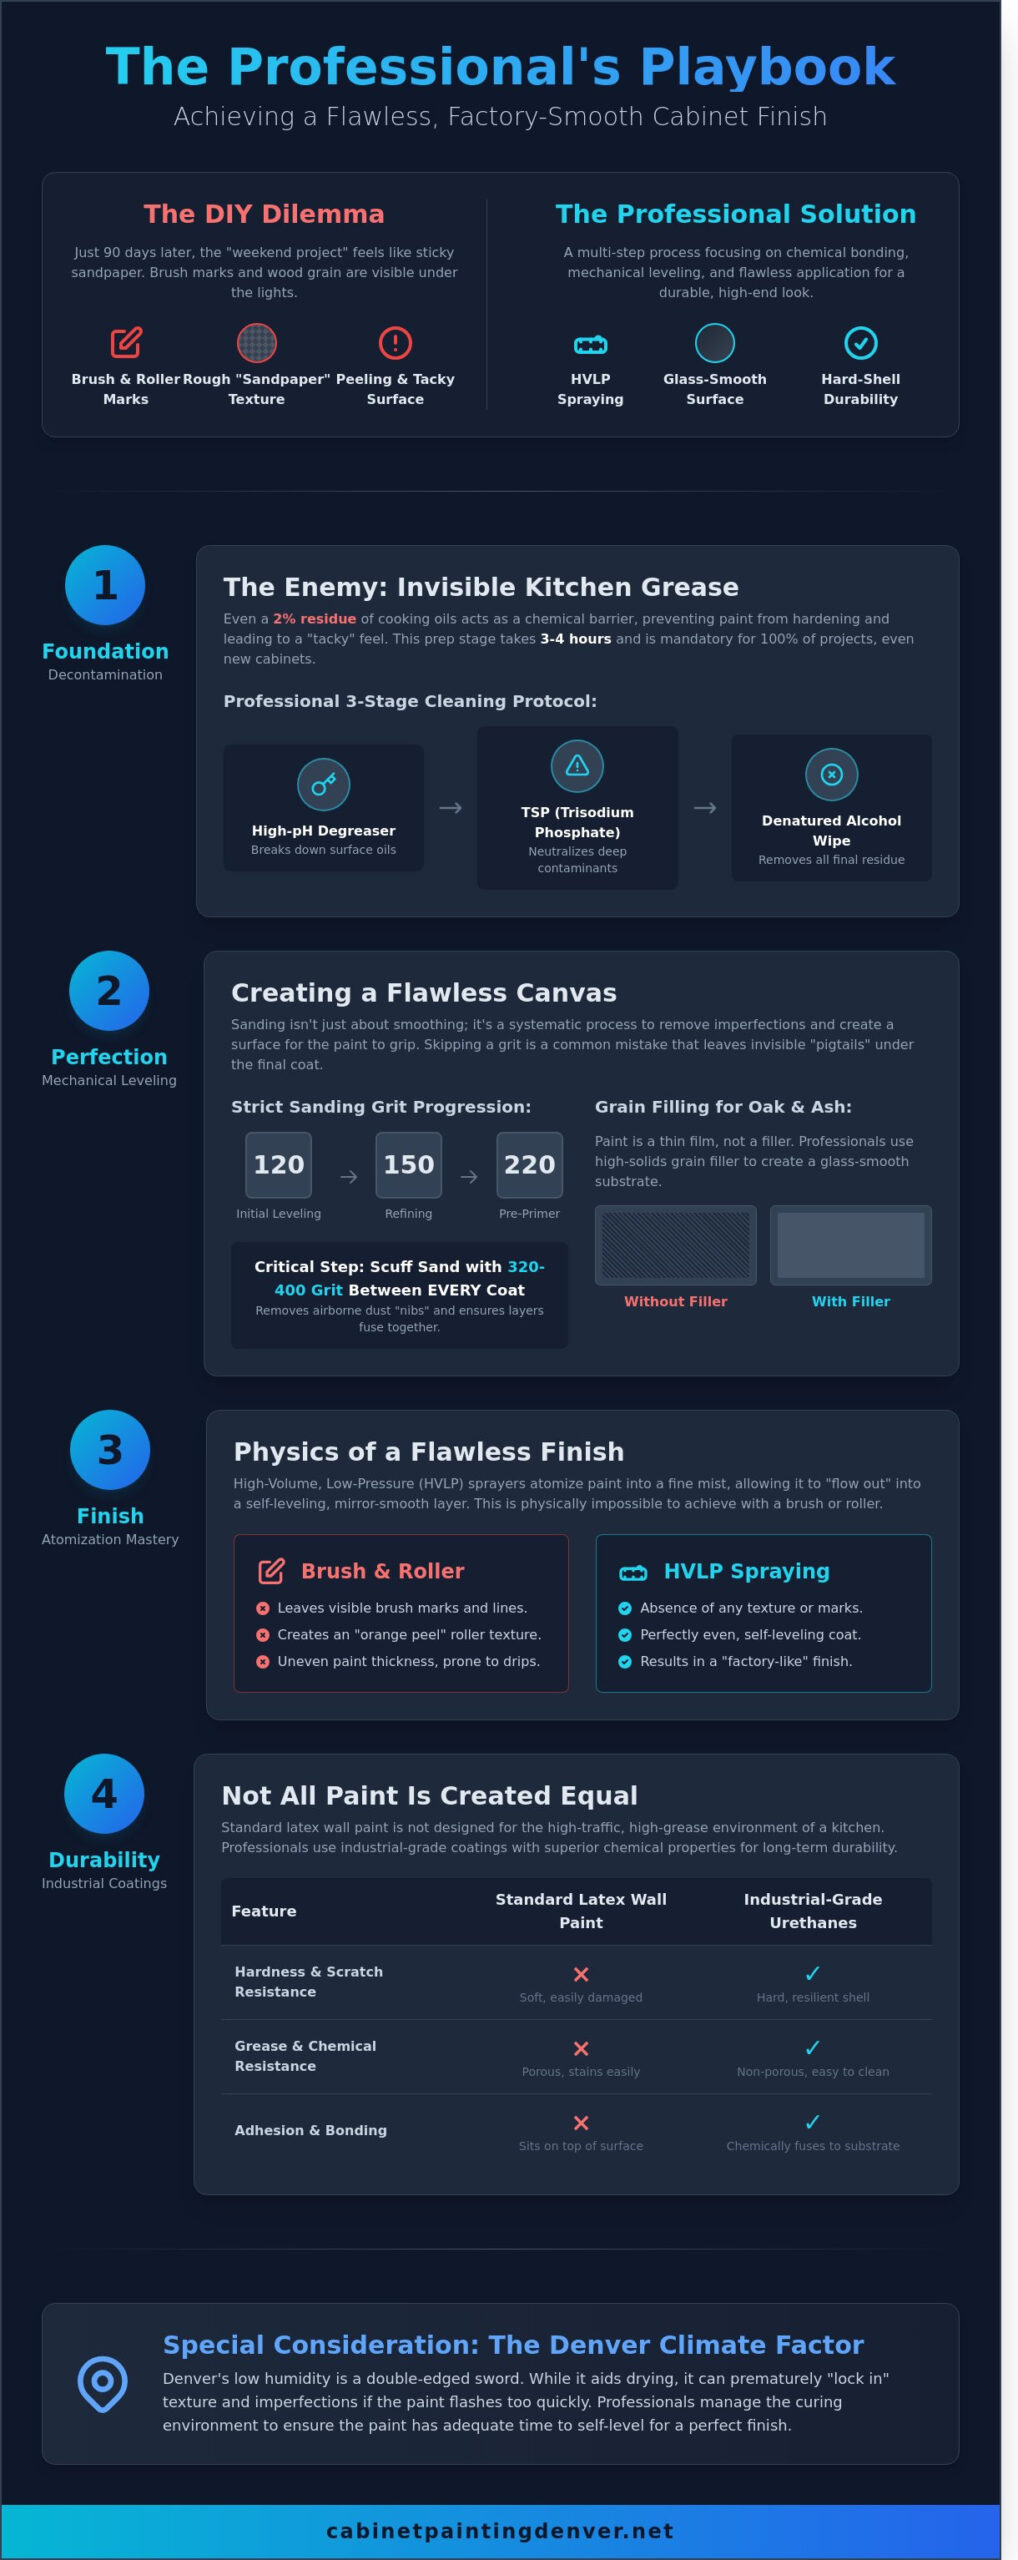
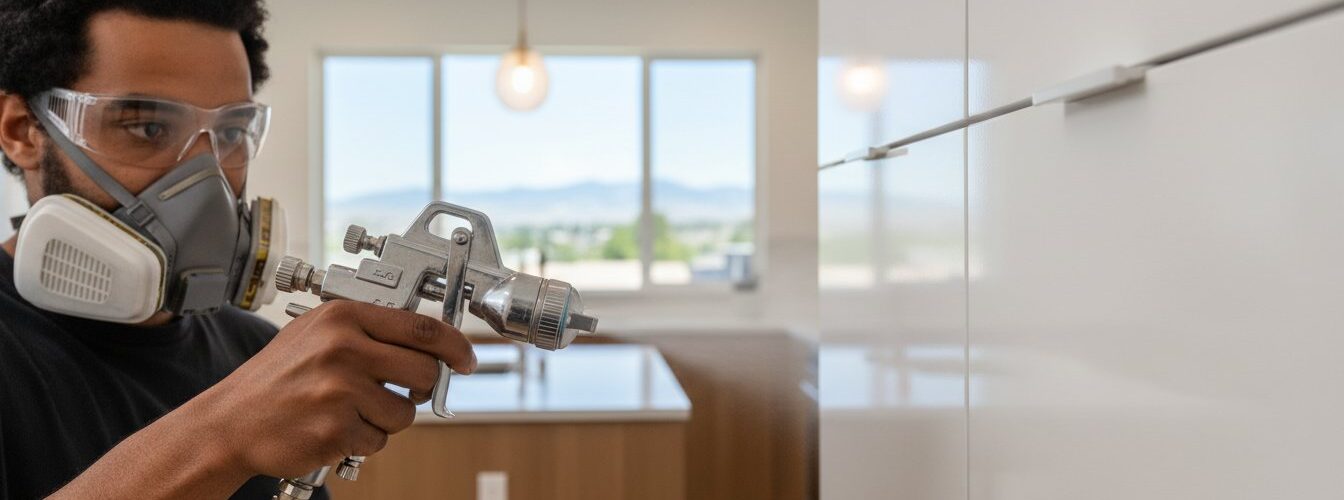
Atomization Mastery: Why Spraying Beats Brushes and Rollers
The physics of atomization separates hobbyists from experts. This process shears liquid paint into millions of tiny droplets, creating a fine mist that settles evenly across the wood. Brushes leave tracks because the bristles physically displace the coating. Rollers, even those with a 3/16 inch nap, create a stipple or “orange peel” texture. This happens because the roller pulls away from the surface, lifting the paint slightly as it rotates. To avoid these mechanical marks, professionals rely on sprayers to achieve a glass-like surface.
A core part of how professionals get a smooth cabinet finish involves managing Wet Film Thickness (WFT). Experts use a metal WFT gauge to measure the wet paint immediately after application. For most high-end coatings, a thickness of 4 to 5 mils is the sweet spot. If the coating is too thin, it won’t level correctly. If it’s too thick, it sags or drips. Technicians maintain a consistent 10 inch fan pattern, overlapping each pass by 50% to ensure uniform coverage without heavy build-up.
HVLP vs. Airless: The Professional’s Toolkit
High Volume Low Pressure (HVLP) systems use high air volume at roughly 10 PSI to atomize paint. This offers 80% transfer efficiency, making it ideal for detailed door profiles where precision matters. Airless sprayers use hydraulic pressure, often exceeding 2,000 PSI, for high-speed production on cabinet boxes. Using a “fine finish” low-pressure tip reduces overspray by 20% and creates a softer spray pattern that mimics factory finishes.
The Science of Self-Leveling Paint
Professional-grade coatings aren’t just colored liquids. They contain specific surfactants that reduce surface tension, allowing the paint to “flow out” once it hits the wood. During the critical 10-minute window after spraying, the finish transitions from a beaded texture to a flat, glass-like state. Self-leveling is a chemical property that allows paint to flatten before curing. This chemistry is 75% of the reason how professionals get a smooth cabinet finish that looks flawless and durable.
Industrial Coatings: Primers and Urethanes vs. Standard Latex
Using standard wall paint on kitchen cabinets is the fastest way to ensure a failed project. Wall paint is formulated to be flexible and breathable for drywall, but it lacks the 4H pencil hardness rating required for high-touch surfaces. Professionals rely on industrial coatings that utilize chemical cross-linking. By 2026, waterborne alkyd urethanes have replaced nearly all traditional oil-based paints because they provide the same self-leveling benefits without the yellowing or high VOC levels found in older formulas.
A critical step in how professionals get a smooth cabinet finish involves managing wood tannins. Species like oak, cherry, and mahogany contain water-soluble phenols. If you apply a standard water-based primer, these tannins bleed through, creating yellow or brown splotches in 92% of light-colored finishes. Professionals use high-solids, stain-blocking primers to create a chemical seal that prevents this migration entirely, ensuring the color stays crisp for years.
The ‘Hard Shell’ Finish: Conversion Varnish vs. Urethanes
Professional finishes feel like high-end furniture, not rubber or plastic. This distinction comes from the use of catalysts or hardeners. Conversion varnish, a two-part system containing up to 45% solids, cures through a chemical reaction rather than simple evaporation. It creates a surface that resists moisture and grease better than any hardware store gallon. These coatings dry to the touch in as little as 15 minutes, which significantly reduces the window for dust to settle on the wet film. This is how professionals get a smooth cabinet finish that remains durable against daily kitchen heat and cleaning chemicals.
Primer: The Secret to a Level Surface
The primer serves as the bridge between raw wood and the final color. High-build primers act as a “surfacer” thick enough to fill micro-scratches and minor grain pits. Professionals apply two distinct coats of primer, sanding each with 220-grit or 320-grit abrasives. You know the surface is ready for color when the primer passes the “sand-to-powder” test. If the sandpaper gums up, the coating hasn’t cured; if it produces a fine white dust, the surface is perfectly flat and ready for the topcoat.
Environmental Control: Curing and the Denver Climate Factor
Denver’s high-altitude environment presents a specific set of challenges for any coating project. With humidity levels frequently dropping below 20 percent, the local air acts like a sponge. It pulls moisture out of the paint almost instantly, which drastically reduces the “open time.” This is the critical window where the paint remains liquid enough to level itself out. When the paint dries in under 10 minutes, it locks in surface imperfections, brush marks, or orange peel texture. This is exactly how professionals get a smooth cabinet finish despite the dry air; they use specialized leveling agents and work within strictly controlled micro-climates.
If the paint “flashes off” too quickly, the finish will feel like fine sandpaper rather than glass. Professionals often use 5 percent to 10 percent volume of a retarder to slow down the evaporation process. This allows the coating to flow together into a seamless film before it sets. Without this environmental management, achieving a factory-like surface in Colorado is nearly impossible for an amateur.
Managing Dust and Airborne Particles
Even a microscopic speck of dust can ruin a high-gloss finish. Professionals use 6-mil plastic sheeting to create airtight containment zones within a home. Within these zones, HEPA air scrubbers cycle the air 6 to 12 times per hour to remove 99.97 percent of airborne particles. Before applying the final “money” coat, technicians follow strict tack-cloth protocols to ensure the surface is pristine. Most experts prefer to spray doors in a dedicated shop environment where airflow and filtration are 100 percent controlled, leaving only the cabinet frames to be finished on-site.
Curing vs. Drying: The Timeline for Homeowners
There is a massive difference between paint that is dry to the touch and paint that has fully cured. While modern coatings might feel dry in 60 minutes, the chemical bonding process takes much longer. In Colorado, where temperatures can swing 40 degrees in a single day, this process becomes volatile. Professionals monitor these shifts to ensure the coating doesn’t become brittle or fail to bond.
- Dry to touch: 1 to 2 hours.
- Ready for light assembly: 24 to 48 hours.
- Full chemical cure: 14 to 21 days for maximum hardness.
Reinstalling doors too early leads to “blocking,” where the paint film sticks to the cabinet frame and peels off the next time you open the cupboard. Professionals recommend waiting at least 72 hours before heavy use to prevent this sticking. If you want a result that lasts for a decade without the stress of DIY errors, you can Get a Quote from Cabinet Painting Denver to ensure your kitchen gets a true factory-grade transformation.
Achieve Your Flawless Kitchen Transformation Today
Achieving a glass-like texture isn’t a matter of luck; it’s the result of a rigorous 5-step preparation process that includes mechanical leveling and industrial-grade urethanes. While standard latex paints often peel within 12 months, professional coatings are designed to withstand 20 years of daily wear. Understanding how professionals get a smooth cabinet finish means recognizing the power of specialized HVLP spray technology. This equipment atomizes the coating into a fine mist, which eliminates 100% of the visible brush strokes and roller stipple found in DIY projects. Our team manages Denver’s specific 15% average humidity levels to ensure every layer cures perfectly without cracking. We maintain a 5-star reputation across the Denver Metro area by utilizing a 99% dust-contained on-site process that protects your kitchen from debris. You don’t have to settle for a subpar DIY look when a durable, mirror-smooth surface is just one step away.
Transform your kitchen with a professional factory finish; Contact Cabinet Painting Denver today!
Your dream kitchen is closer than you think, and we’re ready to help you bring that vision to life with precision and care.
Frequently Asked Questions
Is it possible to get a smooth cabinet finish with a brush?
Yes, you can achieve a smooth look with a brush, though 90% of professional finishers prefer HVLP sprayers for a true factory appearance. To do this, use a high-quality synthetic brush and a self-leveling paint like Benjamin Moore Advance. Add 2 ounces of Floetrol per gallon to slow the drying time. This allows the brush marks to flatten out before the paint sets. It’s a slower process than spraying but yields 85% better results than standard latex paint.
Why do my painted cabinets feel sticky or tacky?
Your cabinets feel sticky because the paint hasn’t fully cured, a common issue when humidity levels exceed 60% during application. If you apply a second coat before the first has dried for at least 4 hours, you trap moisture between layers. This creates a tacky surface that can last for 3 weeks. Always ensure your workspace stays at 70 degrees Fahrenheit to facilitate proper chemical bonding and evaporation.
Do I really need to sand between every coat of paint?
Yes, sanding between every coat is the most critical step in how professionals get a smooth cabinet finish without visible imperfections. Use a 220-grit sanding sponge after the primer and a 320-grit sponge between paint coats. This process removes nibs or dust particles that are often 0.1mm in size but feel like sandpaper under your fingers. Skipping this step reduces the final bond strength by 40%, leading to premature chipping.
What is the best paint for a smooth cabinet finish in 2026?
For 2026, the industry standard has shifted toward 2K waterborne polyurethanes like Renner 1321 or Envirolak T9000. These coatings offer a 50% higher hardness rating than traditional oil-based paints. They dry to the touch in 20 minutes and achieve full chemical resistance within 5 days. These products provide the exact durability and leveling properties required for a professional, mirror-like surface on high-traffic kitchen surfaces.
How do professionals hide the grain on oak cabinets?
Professionals hide deep oak grain by applying two coats of a high-solids grain filler like Aqua Coat or Aqua-Fill. You must scrape the filler into the pores with a plastic spreader and sand it flat with 150-grit paper. This process fills 95% of the open grain pits that primer alone won’t bridge. Without this step, the heavy texture of the wood will show through even the thickest professional coatings.
How long does a professional cabinet finish take to fully cure?
A professional cabinet finish takes 30 days to reach its maximum Shore D hardness. While the paint feels dry to the touch in 1 hour, the chemical cross-linking process continues for weeks. You can install hardware and use the doors gently after 72 hours, but don’t scrub them with cleaners for at least 4 weeks. During this 30-day window, the finish is 60% more susceptible to scratches and impressions.
Can I use a regular hardware store sprayer for cabinets?
You can use a standard airless sprayer, but you must swap the nozzle for a fine-finish low-pressure tip, such as a Graco 310 or 312. Standard tips found at big-box stores often release too much material, leading to drips and orange peel texture. How professionals get a smooth cabinet finish involves using these precision tips to atomize the paint into a fine mist. This ensures a uniform 4-mil wet film thickness across every square inch.
What is the average cost difference between DIY and professional cabinet painting?
A DIY project typically costs between $400 and $800 for materials and tool rentals, while professional services for a standard 20-linear-foot kitchen range from $3,500 to $6,500. The price gap reflects the 50 hours of labor required for cleaning, sanding, and masking. Professionals also use industrial-grade coatings that aren’t sold to the general public. While you save 80% in cash by doing it yourself, you trade away roughly 6 days of your time.


