
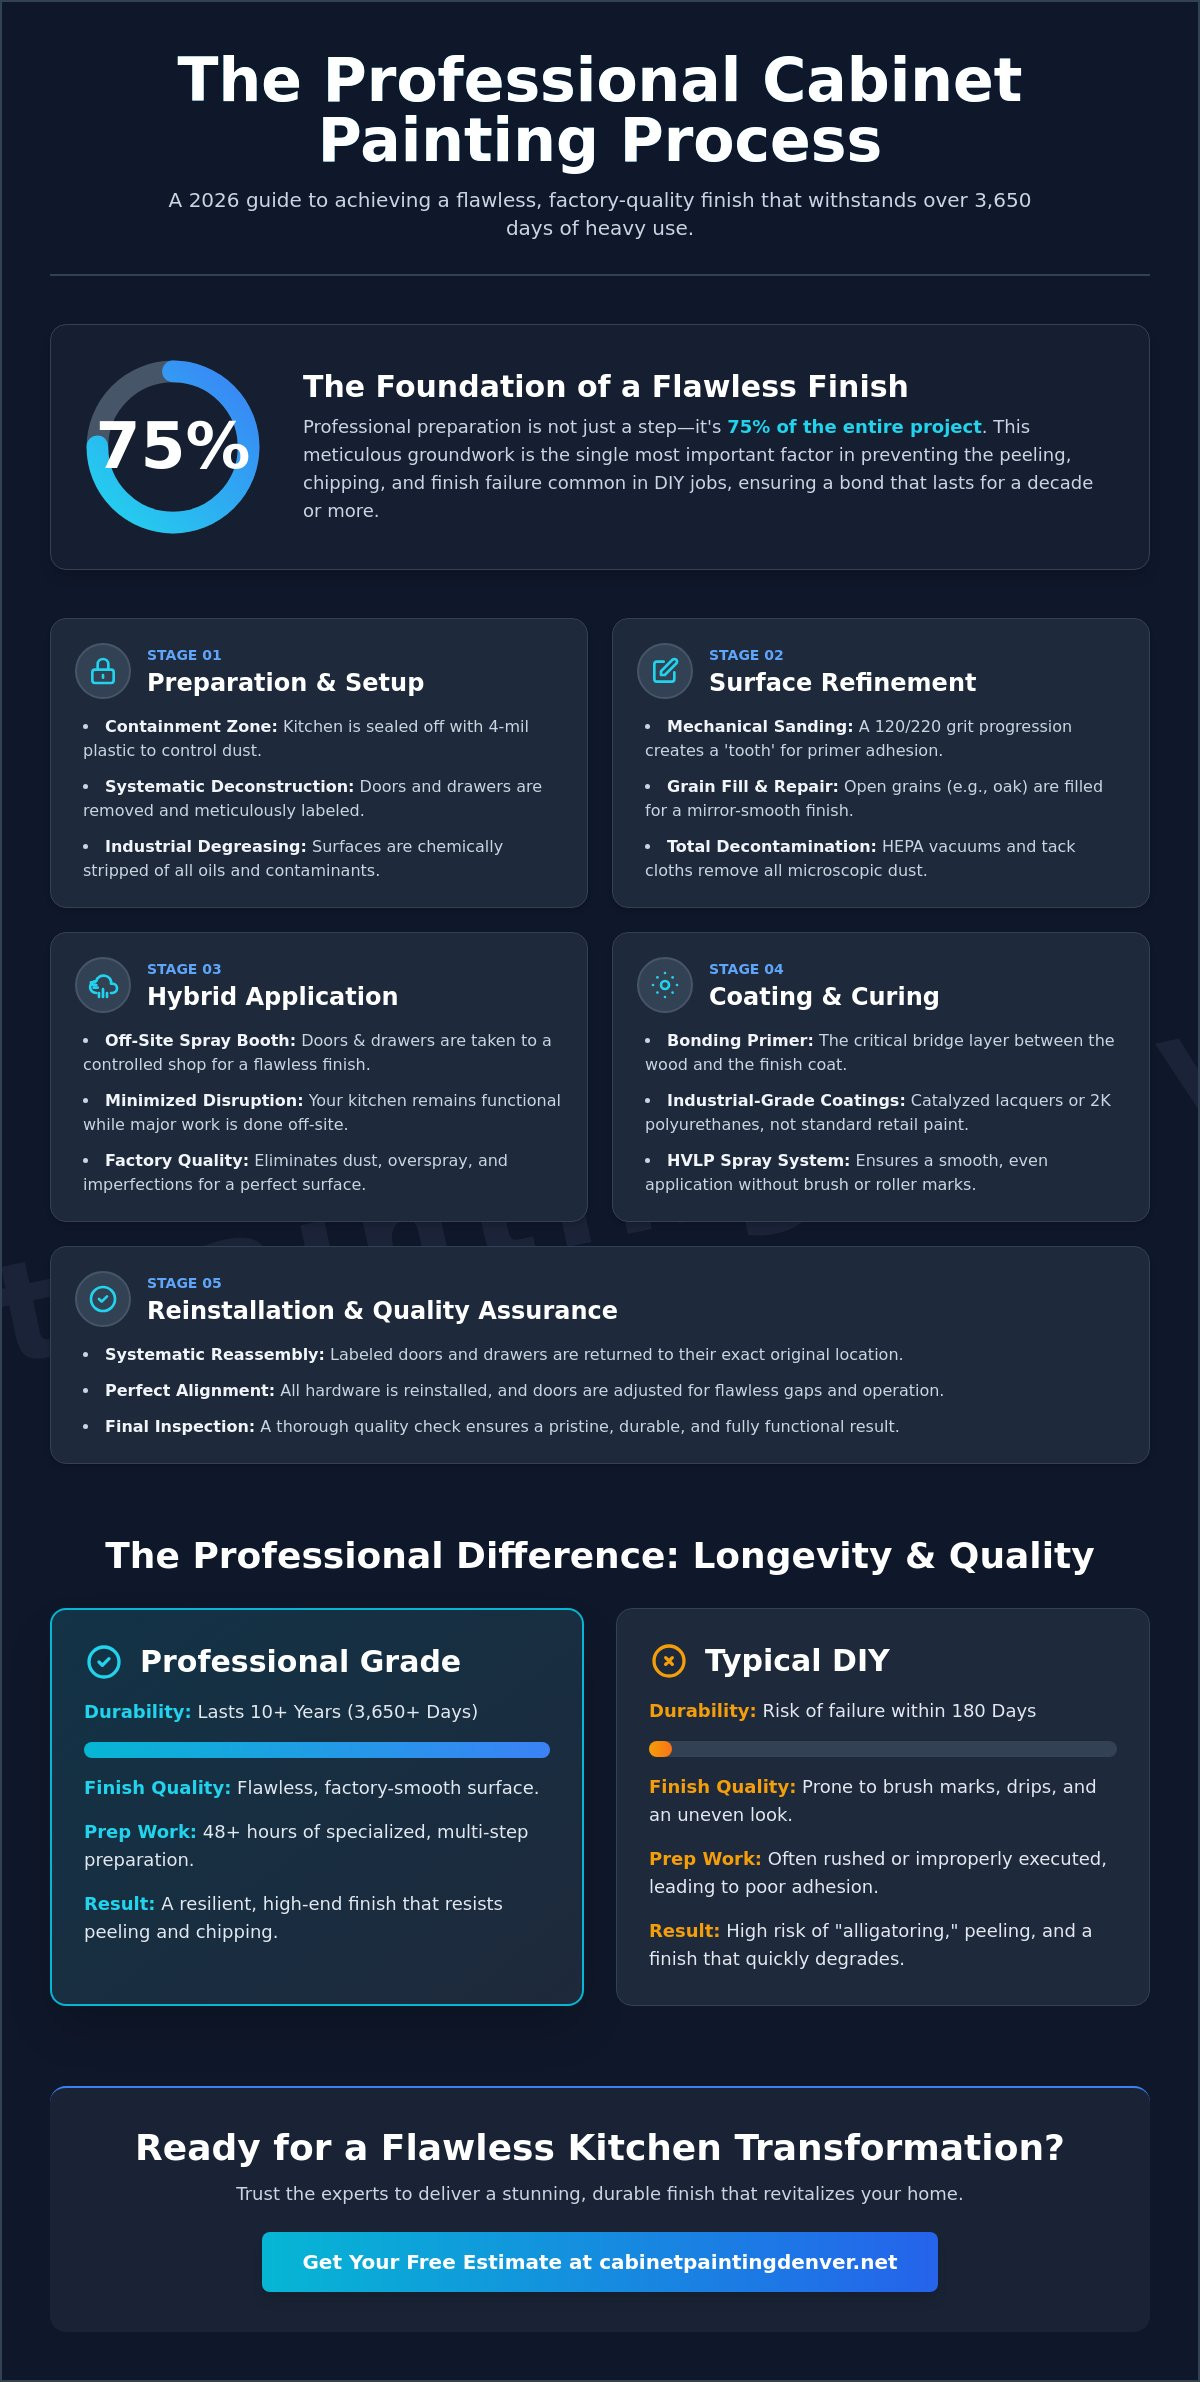
What if the difference between a kitchen that looks brand new and a DIY disaster that peels within 180 days is just 48 hours of specialized prep work? It’s a common fear for homeowners who want a fresh look but dread the thought of their kitchen being a construction zone for 14 days. You likely agree that your kitchen is the heart of the home, so the anxiety surrounding potential downtime and the risk of a flaky finish is completely valid. Understanding the professional cabinet painting process from start to finish helps demystify the labor and highlights why specific techniques are vital for longevity.
In this 2026 guide, you’ll discover the exact step by step professional workflow that transforms dated wood into a factory-quality finish that lasts for 10 years. We’ll show you how experts achieve a smooth, durable surface while keeping your home life functional and minimizing disruption. We are going to break down every stage of the journey, from the initial degreasing to the final high-volume, low-pressure spray application that ensures your cabinets look pristine for over 3,650 days of heavy use.
Key Takeaways
- Learn why professional preparation accounts for 75% of the project and how it prevents the common peeling issues found in DIY jobs.
- Master the professional cabinet painting process from start to finish, including the mechanical sanding and grain-filling techniques required for a mirror-smooth surface.
- Discover the “hybrid” application method that utilizes off-site spray booths to deliver a flawless, factory-quality finish on your cabinet doors.
- Identify the specific industrial-grade coatings and multi-coat systems that offer superior durability compared to standard retail paints.
- Explore the systematic reinstallation process that ensures every door is perfectly aligned and functional once the transformation is complete.
The Foundation of a Flawless Finish: Preparation and Setup
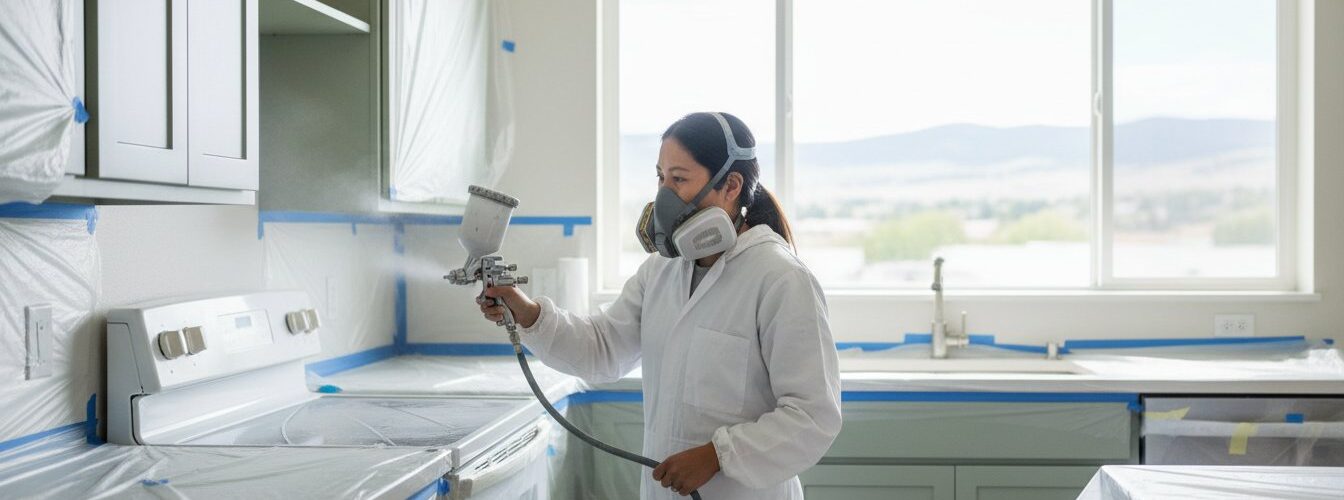
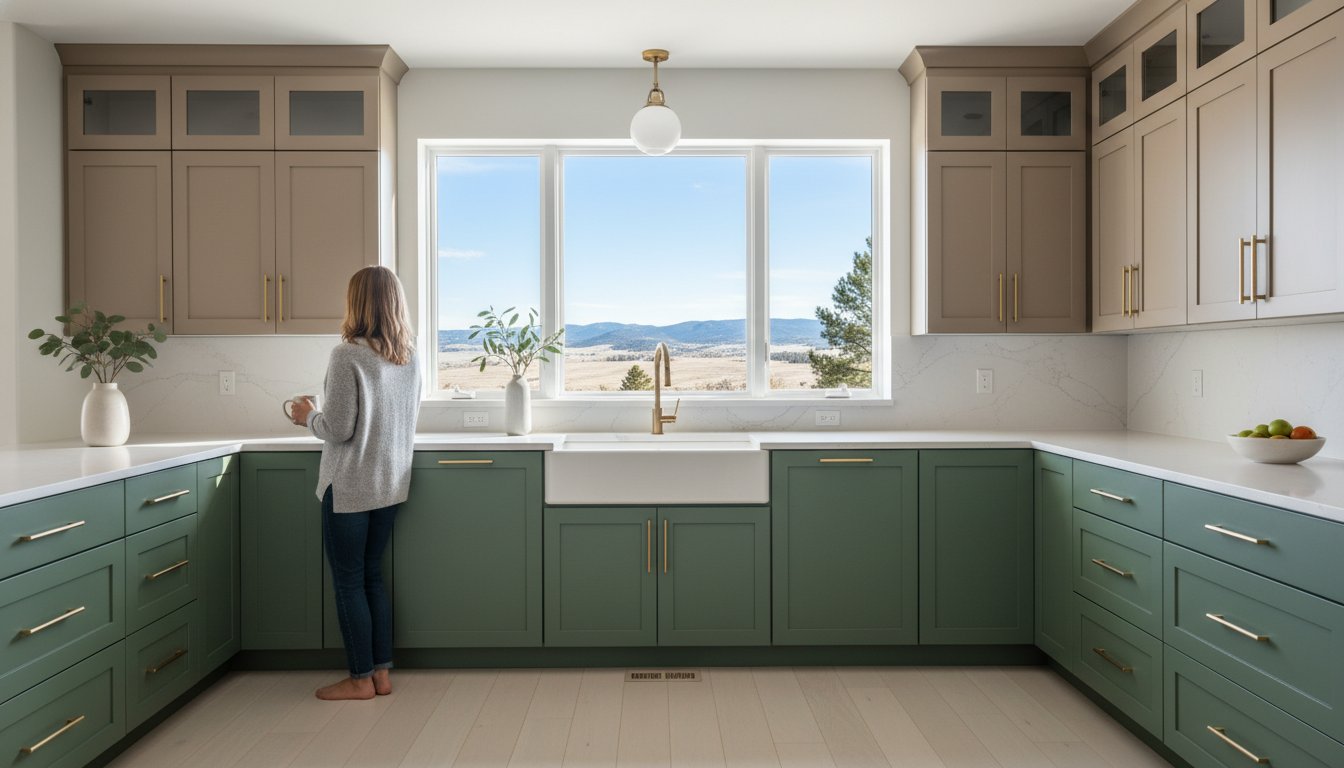
Professional cabinet painting isn’t just a quick cosmetic upgrade. It’s a high-performance refinishing system designed to withstand the daily rigors of a high-traffic kitchen. Experts in the field recognize that preparation accounts for 75% of the total project timeline. If the foundation isn’t perfect, the final coat won’t last. This rigorous cabinet painting process from start to finish begins by transforming your kitchen into a controlled environment. Technicians use 4-mil plastic sheeting and tension poles to create a containment zone, ensuring that dust and overspray don’t migrate to the rest of your home.
Achieving a factory-grade result requires more than just a steady hand. It demands a deep understanding of material science. You can learn more about the technical requirements of surface prep and coating adhesion in this comprehensive guide to wood finishing. This foundational knowledge ensures that every layer applied is chemically compatible with the wood beneath it.
To better understand how these initial steps look in a real-world setting, watch this helpful video:
Deconstruction and Labeling
The first physical step involves the systematic removal of all doors, drawer fronts, and decorative hardware. Professionals don’t just toss these into a pile. They use a precise numbering system, often placing small labels or written digits inside the hinge cups where they’ll be hidden after reinstallation. This ensures every piece returns to its original frame, maintaining the alignment of the cabinet painting process from start to finish. Once labeled, removable components are carefully transported to a dedicated spray shop for a dust-free application.
Cleaning and Degreasing the Substrate
Standard dish soap can’t touch the years of polymerized cooking oils and skin oils found on kitchen surfaces. Professionals utilize industrial-strength deglossers or TSP substitutes to strip away these contaminants and create a “clean slate.” This chemical cleaning is non-negotiable for a long-lasting bond. Applying premium paint over residual kitchen grease leads to immediate finish failure, often resulting in visible peeling or “alligatoring” within the first 180 days of use. Without a chemically clean surface, the primer simply cannot bite into the wood fibers.
Surface Refinement: Sanding, Repairing, and Priming
The second stage of a professional cabinet painting process from start to finish focuses on creating a flawless substrate. You cannot simply apply paint over an existing factory finish and expect it to last. The first step involves mechanical sanding using 120-grit sandpaper to break the original seal. This creates a mechanical “tooth” that allows subsequent layers to grab hold. Without this step, the new finish will likely peel within 12 to 18 months.
Once the surface is scuffed, technicians focus on repairs. For open-grain woods like oak, which accounted for roughly 70% of kitchen installs in the late 1990s, grain filling is mandatory. We apply a specialized filler to bridge the deep pores, ensuring the final look is smooth rather than pitted. We also address minor dents and hardware holes using a two-part wood epoxy. This material cures in about 20 to 30 minutes, providing a stable repair that won’t shrink or crack under the weight of the topcoat. A secondary fine-grit sanding with 220-grit paper follows, leveling the patches and smoothing the wood fibers for a uniform feel.
The Grit Progression Strategy
Professional painters follow a strict grit progression to avoid leaving visible swirl marks. Starting with 120-grit removes the sheen, while moving to 220-grit refines the surface. We use random orbital sanders for flat door panels to maintain an even pressure. For tight profiles and inside corners, hand-sanding is the only way to ensure 100% coverage. Cleanliness is the final part of this phase. We use high-volume HEPA vacuums followed by tack cloths to remove every microscopic particle of dust. Even a small amount of leftover debris can ruin a high-end finish.
Choosing the Right Bonding Primer
The primer acts as the critical bridge between the raw wood and the color coat. We prioritize high-build, stain-blocking bonding primers. Shellac-based primers are the industry standard for blocking tannins, which are the natural oils in wood that cause yellow spotting. This chemical barrier is why professional cabinet refinishing looks superior to DIY attempts. After the primer cures, we perform a final “scuff sand” with 320-grit paper. This removes any raised grain caused by the moisture in the primer, leaving a surface as smooth as glass. If you want to ensure your kitchen meets these 2026 durability standards, you can request a professional assessment of your current cabinet condition.
This meticulous attention to surface refinement is what separates a standard paint job from a factory-grade restoration. By the time the primer is scuff-sanded, the cabinets are perfectly prepped for the final cabinet painting process from start to finish, ensuring the color coats lay down flawlessly without imperfections.
The Professional Edge: Shop Spraying vs. On-Site Painting
The core difference between a DIY project and a professional cabinet painting process from start to finish lies in the application method. While many homeowners reach for a brush or roller, professionals rely on HVLP (High Volume Low Pressure) technology. This equipment atomizes the coating into a fine mist, achieving a level of smoothness that mimics original factory cabinetry. Brush marks and roller stippling are non-existent in a professional finish. By 2026, transfer efficiency for high-end HVLP systems has reached nearly 90%, ensuring that more paint lands on the wood and less becomes overspray.
Professionals utilize a hybrid logistics model to balance quality with home accessibility. The process involves removing all doors and drawer fronts to be treated in a controlled shop environment. The fixed cabinet frames remain in the home. This split approach allows for specialized treatment of the most visible components while keeping the kitchen functional for the duration of the project.
The Benefits of Off-Site Door Spraying
A professional spray booth provides a sterile, dust-free environment that is impossible to replicate in a standard kitchen. Shop finishing allows technicians to spray doors horizontally on specialized drying racks. This orientation uses gravity to help the paint self-level, which prevents the runs and drips often seen on vertical surfaces.
Climate control plays a massive role in the final bond. Industry data from 2025 suggests that maintaining a consistent 45% humidity level and a temperature of 72 degrees Fahrenheit optimizes the chemical cross-linking of modern waterborne alkyd paints. Shop finishing also keeps the strongest odors and the bulk of the equipment out of your living space. This reduces the project footprint in your home by approximately 70% compared to traditional on-site methods.
On-Site Frame Painting and Containment
While doors are at the shop, the focus shifts to the fixed frames. Professional containment is what separates a clean job from a messy one. Technicians use “zip-walls,” which are heavy-duty plastic barriers held up by telescopic poles, to isolate the kitchen from the rest of the house. Inside this zone, HEPA air scrubbers run constantly. These units are rated to capture 99.97% of airborne particles as small as 0.3 microns, ensuring the air remains breathable and the wet paint stays clean.
The masking process is meticulous. Every inch of the flooring, appliances, and cabinet interiors is covered with protective paper and 3M Scotchblue tape. You can find more detailed home prep tips in this kitchen cabinet painting guide. This level of protection is a standard part of the cabinet painting process from start to finish, preventing overspray from reaching your granite countertops or hardwood floors. Once the frames are cured and the doors return from the shop, the containment is removed, leaving behind a transformed space with zero mess.
Applying the Finish: Industrial Coatings and Curing
The cabinet painting process from start to finish reaches its most critical stage during the application of high-performance industrial coatings. Many homeowners assume that “cabinet paint” from a local hardware store is sufficient, but these retail products often lack the chemical resilience required for high-traffic kitchens. Professional finishes rely on a four-coat system. We apply two layers of high-build primer followed by two layers of pigmented topcoat to create a surface that looks and feels like a factory finish.
Between each application, we monitor “flash time” carefully. This is the specific interval where solvents evaporate, allowing the coating to become tacky enough for the next layer to create a permanent chemical bond. If a technician ignores this 20 to 30-minute window, the layers won’t fuse properly, leading to delamination or peeling. This precision is what separates a professional result from a standard house paint job.
Why We Use Catalyzed Coatings
A catalyzed coating includes a specific chemical hardener that triggers a cross-linking reaction. This process creates a dense, plastic-like shell that standard paints cannot replicate. These industrial finishes are engineered to resist 95% of common kitchen contaminants, including grease, vinegar, and high-acidity juices. You can learn more about these chemical properties by reading our guide on the best paint for cabinets.
Denver Climate and Curing Factors
Denver’s unique 2026 climate influences how we manage the final stages of the cabinet painting process from start to finish. Our local humidity frequently drops below 15%, which can cause coatings to dry too rapidly on the surface while remaining soft underneath. We mitigate this by maintaining a controlled workspace between 65 and 75 degrees Fahrenheit. This temperature range ensures the coating levels out perfectly without trapping air bubbles.
It’s vital to distinguish between “drying” and “curing.” While your doors might feel dry to the touch within 60 minutes, the chemical curing process continues for several days. We advise homeowners to wait at least 48 hours before resuming heavy use of their kitchen. This waiting period allows the finish to reach a high level of hardness, protecting your investment from immediate scuffs or fingernail marks. Following these protocols ensures the finish remains durable for a decade or more.
Ready to upgrade your kitchen with a factory-grade finish? Request a professional quote from our Denver team today.
The Final Transformation: Reinstallation and Quality Assurance
The concluding phase of the cabinet painting process from start to finish involves moving finished components from the controlled shop environment back into your home. This logistics step is critical; professional crews use padded transport systems to ensure the factory-grade finish doesn’t chip or scratch during transit. Once on-site, the team references a detailed numbering system created during the initial teardown. This ensures each door and drawer front returns to its precise original frame, maintaining the structural integrity of your cabinetry.
- Hardware Integration: Technicians reinstall original handles or drill new holes for upgraded hardware using precision jigs to ensure 90-degree alignment.
- The Final Walkthrough: Homeowners join the lead technician for a 100% inspection of every surface, checking for uniform sheen and smooth edges under various lighting conditions.
- Touch-up Protocol: Any minor imperfections caused during transport are addressed on-site with specialized micro-brushes to guarantee a seamless look.
Understanding the full cabinet painting process from start to finish helps homeowners appreciate why the final walkthrough is the most rewarding step. It’s the moment when the vision for the kitchen finally becomes a reality, and the protective masking is removed to reveal the completed transformation.
Precision Reinstallation
Achieving a high-end look requires more than just fresh paint; it demands perfect alignment. Expert installers spend significant time adjusting 3-way hinges to ensure “reveals,” which are the gaps between doors, are perfectly level and consistent. This level of detail is why cabinet painting Denver pros focus on the mechanical side of the job as much as the aesthetic side. To finish the installation, new clear silicone bumpers are applied to the interior corners of every door. These small additions prevent the paint from sticking to the frames and eliminate the loud clanking sound of wood hitting wood.
Post-Project Care and Maintenance
Your cabinets will look stunning immediately, but the finish requires specific care during the initial “soft cure” period. While the paint is dry to the touch, it takes roughly 30 days for the coating to reach its maximum hardness and chemical resistance. During this month, you should avoid scrubbing the surfaces or using heavy cleaning agents. For long-term maintenance, stick to a soft microfiber cloth dampened with warm water and a single drop of mild dish soap. Avoid products containing ammonia, bleach, or abrasive “magic” sponges, as these can dull the professional sheen over time. Following these steps ensures your kitchen remains a centerpiece for years to come.
Elevate Your Home with a Professional Cabinet Refresh
Your kitchen deserves more than a basic facelift. A high-end result relies on meticulous surface refinement and the use of industrial-grade coatings that withstand daily wear. By choosing shop-applied HVLP spraying over traditional brush methods, you ensure a smooth finish that looks like it came straight from the factory floor. Understanding the entire cabinet painting process from start to finish helps you make an informed investment in your home’s long-term value and aesthetic appeal.
Our team brings over 15 years of Denver-local experience to every project we undertake. We utilize a 5-star rated professional crew to manage every detail, ensuring your cabinets receive a durable, factory-quality finish that resists chipping and fading. You don’t have to settle for less than perfection when upgrading your primary living space. It’s a simple way to breathe new life into your home without the cost of a full remodel. Schedule Your Free Denver Cabinet Painting Estimate Today and start your journey toward a stunning, professional kitchen transformation that your family will enjoy for years.
Frequently Asked Questions
How long does the cabinet painting process take from start to finish?
The professional cabinet painting process from start to finish typically takes 3 to 5 business days for a standard kitchen. Our team spends the first 8 hours on surface preparation and masking. We then utilize 2 to 3 days for priming and applying industrial grade topcoats. The final 24 hours are dedicated to reassembling doors and hardware. This timeline ensures every layer cures properly before you resume normal kitchen use.
Do I need to empty my cabinets before the painters arrive?
You need to remove all items from your cabinets and drawers before the crew arrives on day one. Clearing 100 percent of your belongings prevents overspray and protects your dishes from the fine dust generated during the sanding phase. It also allows painters to properly mask the cabinet interiors. If you leave items inside, the project might face a 4 to 6 hour delay while the site is cleared.
Is the smell of the paint dangerous for my family or pets?
Modern water based coatings are safe for pets and families because they contain low levels of Volatile Organic Compounds. We use products that meet the Greenguard Gold standard, which limits VOCs to less than 50 grams per liter. While you’ll notice a mild scent for 24 to 48 hours, it isn’t toxic. We recommend keeping pets in a separate room with one open window to ensure maximum air circulation during the drying phase.
Can you paint over laminate or thermofoil cabinets?
You can paint laminate or thermofoil cabinets as long as the underlying substrate is not peeling or damaged. We apply a specialized high adhesion primer that creates a mechanical bond with the plastic surface. This method prevents the paint from chipping or flaking over time. Statistics from 2025 industry reports show that 90 percent of thermofoil painting projects succeed when technicians use a dedicated bonding primer rather than a standard latex base.
Will I see the wood grain after the cabinets are painted?
You’ll see the natural wood grain on species like oak or hickory unless you opt for a grain filling service. Open grain woods have deep pores that remain visible under 2 to 3 coats of paint. If you prefer a completely smooth surface, we apply 2 layers of solvent based filler to bridge those gaps. This process reduces visible texture by approximately 85 percent compared to painting directly over the raw wood grain.
What is the difference between cabinet painting and cabinet refinishing?
Cabinet painting covers the wood with an opaque pigment, while refinishing involves stripping the surface to apply a transparent stain. The cabinet painting process from start to finish is often 30 percent faster than full refinishing because it requires less aggressive chemical stripping. Most 2026 homeowners choose painting because it offers a wider range of modern colors. Refinishing is better suited for those who want to highlight the natural wood character.
How do I clean my painted cabinets without damaging the finish?
Clean your painted surfaces using a soft microfiber cloth dampened with a mixture of warm water and 2 drops of mild dish soap. Avoid using abrasive sponges or cleaners containing ammonia, as these chemicals can degrade the finish within 12 months. Wipe spills immediately to prevent moisture from penetrating the topcoat. Regular maintenance with this gentle method can extend the life of your kitchen finish by 5 to 7 years.
Do you provide a warranty for the cabinet painting process?
Professional painters generally offer a 2 to 3 year limited warranty that covers peeling, cracking, or bubbling. This guarantee ensures that the materials and labor meet the standards set by the Painting Contractors Association. If the finish fails due to an application error within 24 months, the contractor will repair the affected area at no cost. Always review the written contract to confirm which specific components of the project are covered by this protection.

