
That unmistakable sea of golden oak. If your kitchen is defined by it, you know the feeling: the entire space can feel dark, dated, and overwhelmingly yellow. You dream of a bright, contemporary kitchen, but the thought of a disruptive, budget-busting renovation is a non-starter. The good news? A stunning transformation is closer and more affordable than you think. You don’t need a total remodel; you just need a smart plan to update 90s oak cabinets and completely change the heart of your home.
In this guide, we’ll walk you through five modern makeover ideas that deliver incredible, professional-looking results. From simple hardware swaps to the secrets of achieving a flawless, durable paint finish that erases that heavy wood grain, we have you covered. Get ready to discover clear, actionable steps to create the bright, beautiful, and more valuable kitchen you’ve been dreaming of.
Key Takeaways
- Start with simple, budget-friendly changes like new hardware and lighting to instantly reduce the dated look of your kitchen without touching the wood.
- Painting is the single most impactful method to completely transform your cabinets, covering the heavy grain and orange tones for a truly modern finish.
- For those who love the wood grain, explore how staining can neutralize the yellow-orange hue while preserving the natural texture of the oak.
- Learn the key strategies to successfully update 90s oak cabinets to fit your budget, skill level, and desired outcome.
Why 90s Oak Cabinets Feel Dated (And Why They’re Worth Saving)
If your kitchen is defined by a sea of honey-toned wood, you’re not alone. The golden oak cabinet was a hallmark of 90s home design, prized for its warmth and durability. But as design trends have shifted towards brighter whites, sleek grays, and rich, moody hues, that once-popular orange-yellow glow can now make a kitchen feel stuck in the past. Before you start planning a full demolition, however, it’s crucial to understand what makes them feel dated and, more importantly, why they are absolutely worth saving.
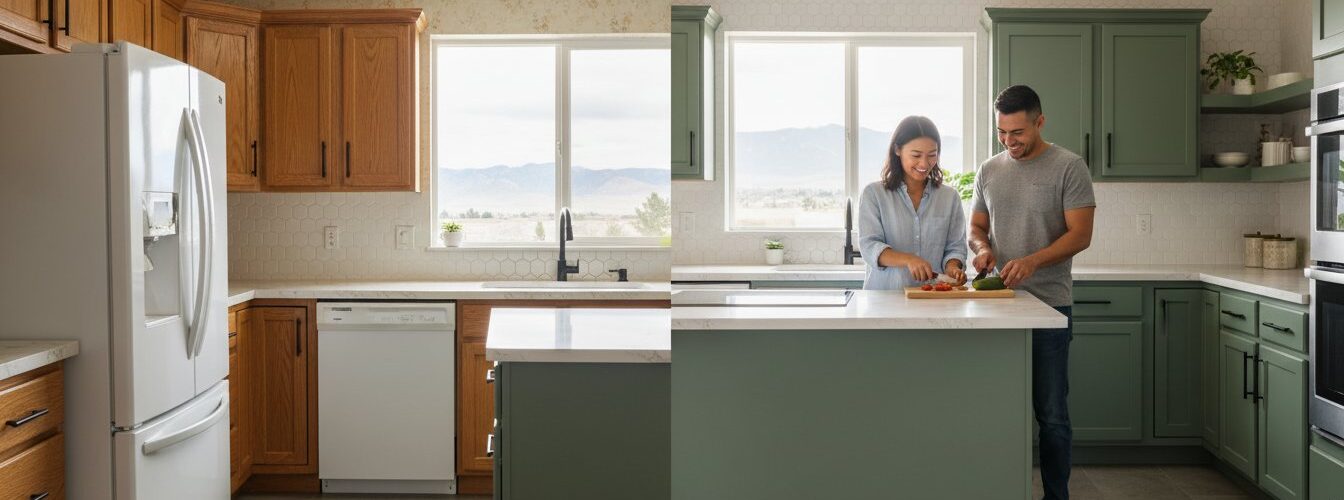
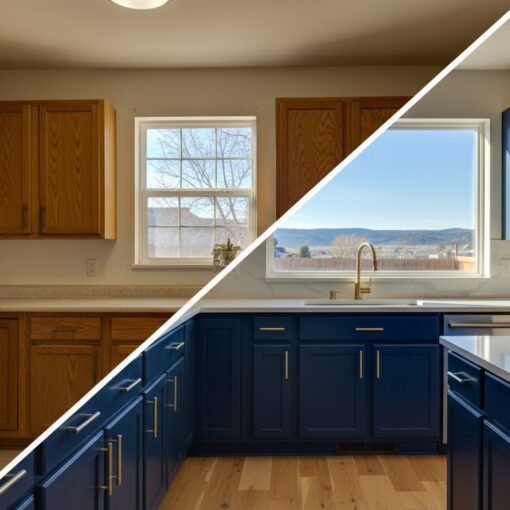
To see just how transformative an update can be, take a look at this project:
The Problem with the ‘Honey Oak’ Look
The dated appearance of 90s oak cabinets comes down to a few key factors. First is the color itself; the oil-based varnishes and shellacs used at the time have a natural tendency to amber and yellow significantly over the decades, creating that distinct “honey” or orange hue. This is compounded by oak’s prominent, open grain, which can look overly busy and rustic compared to today’s preference for smoother, more subtle finishes.
Beyond the color and grain, the design of the kitchen cabinet doors themselves often contributes to the dated feel. Many 90s styles feature arched “cathedral” or rounded top panels, a look that has been largely replaced by the clean, straight lines of modern Shaker or slab doors.
The Hidden Value: Solid Construction
Here’s the secret weapon hiding behind that orange finish: exceptional quality. Unlike many of today’s budget-friendly options made from particleboard or MDF, most 90s oak cabinets were built to last from solid wood frames and durable plywood boxes. They are heavy, sturdy, and structurally sound—a perfect foundation for a modern makeover.
This robust construction makes them ideal candidates for refinishing, whether through painting, staining, or refacing. Choosing to update 90s oak cabinets is not just a budget-friendly alternative to a full replacement; it’s a smart investment. You get to preserve the high-quality craftsmanship of your existing cabinetry while completely transforming your kitchen’s aesthetic for the modern era.
Level 1: Quick & Easy Updates for an Instant Refresh
Not ready for a full-scale renovation? You can still make a significant impact on your kitchen with a few simple, budget-friendly changes. This level is all about working smarter, not harder. Instead of altering the cabinets themselves, we’ll focus on the elements that surround and accentuate them. Think of this as a weekend mini-makeover—a fantastic first step to update 90s oak cabinets and instantly breathe new life into your space without picking up a paintbrush.
Swap Out Hardware: The Easiest Makeover
Nothing dates a kitchen faster than the original hardware. Those shiny, rounded brass or ceramic knobs are a hallmark of the 90s. Swapping them out is a simple, high-impact project you can complete in an hour. Consider these modern options:
- Matte Black: Offers a bold, contemporary contrast against the warm wood grain.
- Brushed Nickel or Satin Chrome: A timeless and versatile choice that complements stainless steel appliances.
- Champagne Bronze: A warm, sophisticated finish that feels current and pairs beautifully with oak.
For an even more dramatic change, switch from knobs to sleek, linear pulls. Pro Tip: Before you buy, measure the distance between the screw holes on your existing hardware. This “center-to-center” measurement ensures your new pulls will fit without drilling new holes.
Modernize Lighting and Fixtures
The warm, yellow glow from outdated incandescent bulbs can amplify the orange and yellow tones in honey oak, making it feel more dated. A strategic lighting upgrade can completely change the room’s ambiance. Start by swapping old bulbs for cooler-toned LEDs in the 3000K (soft white) to 4000K (cool white) range. This neutral light will tone down the orange and make the entire kitchen feel brighter and cleaner.
Next, install peel-and-stick LED strips under your upper cabinets. This addition illuminates your countertops, creating functional task lighting and adding a layer of modern dimension. Finally, consider if a new statement fixture—like a modern pendant light over the island or a sleek new faucet—could become a new focal point, drawing the eye away from the cabinets and toward a stylish feature.
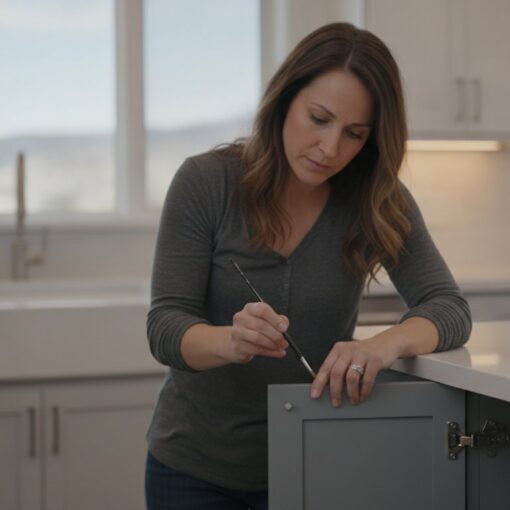
Level 2: The Ultimate Transformation – Painting Your Oak Cabinets
If you’re looking for a complete kitchen overhaul without the cost of a full remodel, painting is your answer. While some homeowners hesitate to cover solid wood, a professional paint job doesn’t just hide the old; it creates a brand new, factory-like finish that is both stunning and durable. This is the single most effective way to truly update 90s oak cabinets for the modern era. The secret to a lasting, beautiful result, however, lies in meticulous preparation and professional application.
Choosing the Right Paint Color
The color you choose sets the entire mood for your kitchen. Today’s trends offer a wide palette to match any style, moving far beyond the honey oak of the past.
- Classic Whites & Off-Whites: Timeless and bright, colors like Sherwin-Williams Pure White make a kitchen feel larger and cleaner.
- Modern Grays & Greiges: Sophisticated and versatile, shades like Benjamin Moore Revere Pewter provide a neutral backdrop that complements stone countertops and modern hardware.
- Bold & Moody Hues: For a dramatic, high-end look, consider a deep navy, forest green, or charcoal. These colors create a stunning focal point.
- The Two-Tone Trend: A popular choice involves painting lower cabinets a darker shade and uppers a contrasting light color to add depth and visual interest.
The Oak Grain Challenge: How Pros Get a Smooth Finish
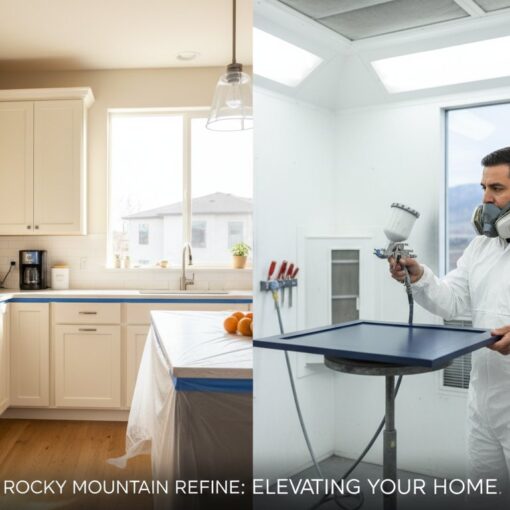
The defining feature of 90s oak is its deep, prominent grain. Simply painting over it results in a textured surface that looks amateurish. Professionals tackle this head-on through a multi-step process: thorough cleaning and degreasing, meticulous sanding, and the crucial application of a high-quality grain filler. This fills the deep pores in the wood, creating a smooth canvas. Paired with a high-adhesion primer designed for slick surfaces, this prep work ensures the final topcoat is flawless and durable.
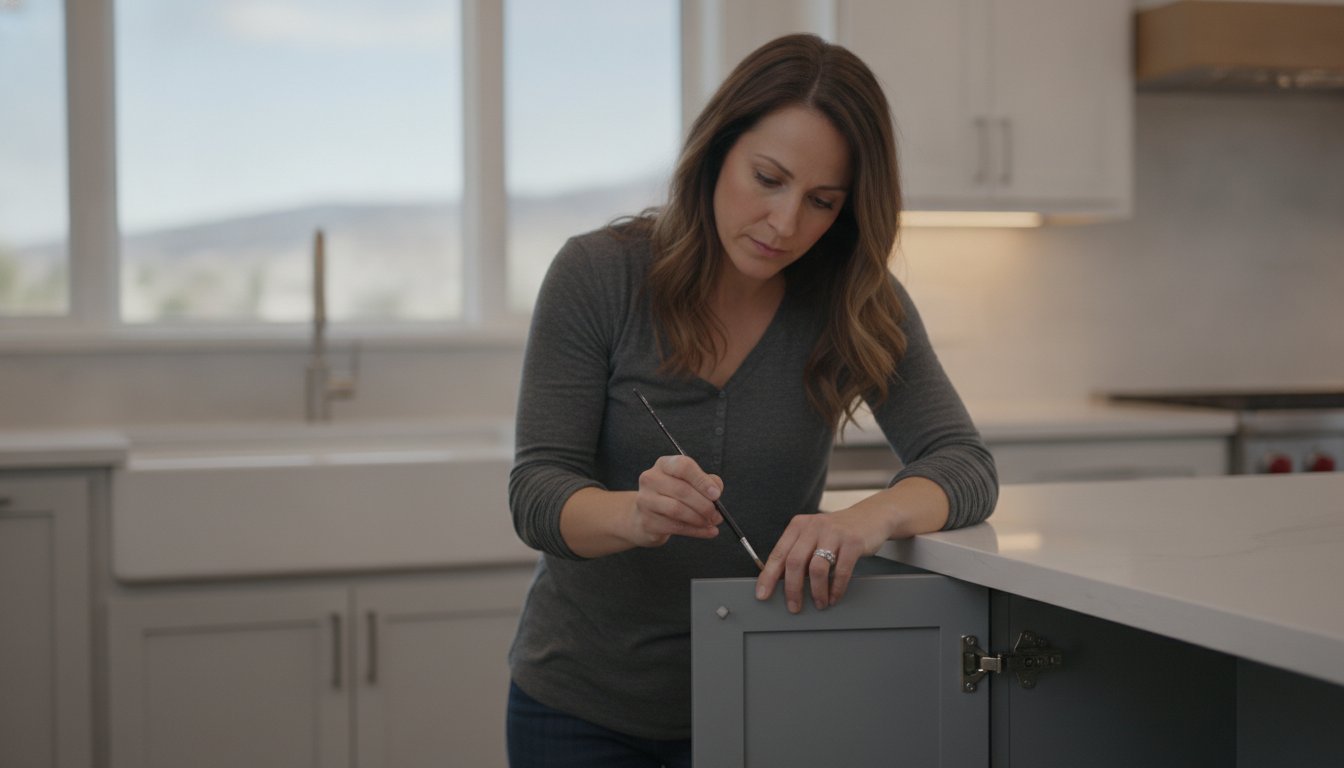
DIY vs. Hiring a Professional Cabinet Painter
Tackling this project yourself can be rewarding and may save money upfront. However, the learning curve is steep and the process is incredibly time-consuming, often leading to drips, brush marks, and a finish that peels prematurely. A professional brings expertise and specialized equipment, like HVLP sprayers, to deliver a flawless, furniture-grade finish in a fraction of the time. The durability and perfection of a professional spray finish are simply unmatched. See what a professional finish looks like. View our gallery of Denver cabinet projects.

Level 3: Working with the Wood – Staining & Refinishing
What if you love the classic grain of your oak cabinets but can’t stand the dated, orange-yellow hue? Painting covers that beautiful texture, but staining and refinishing allow you to change the color while preserving the wood’s natural character. This path is significantly more complex and labor-intensive than painting, but the results can be stunning for those committed to the process.
When you want to update 90s oak cabinets by changing their color, you have two primary options, each with its own set of challenges and rewards.
Going Darker with Gel Stain
Gel stain has become a popular DIY choice because it doesn’t require you to strip the old finish completely. It’s a thick, pudding-like stain that sits on top of the existing surface, acting more like a translucent paint. This method is exclusively for going darker—think transforming honey oak into a rich espresso or cherry finish. However, achieving a smooth, even coat without blotches or streaks requires a meticulous technique and a steady hand.
Stripping and Re-staining for a New Look
For complete color control, you must strip the cabinets down to bare wood. This is a major undertaking involving chemical strippers, scraping, and extensive sanding. Once the old finish is gone, you can apply any color of traditional stain, from a modern light wash to a deep, dramatic tone. Due to the harsh chemicals and the high skill level needed for a flawless result, this method is best left to experienced DIYers or professionals.
Ultimately, working with stain offers a way to enhance, rather than hide, your cabinet’s wood grain. While gel stain provides a shortcut to a darker look, a full strip-and-refinish is the only way to achieve a truly custom, like-new appearance. Because of the precision required, many homeowners find that partnering with a professional is the surest way to get a perfect finish. If you’re exploring refinishing options to update 90s oak cabinets, our experts can deliver a flawless, durable result.
Completing the Vision: Countertops, Backsplashes, and More
You’ve done the heavy lifting by painting your cabinets, but the transformation isn’t over yet. Think of your beautifully refinished cabinets as the perfect neutral canvas. Now, it’s time to add the supporting elements that will tie your entire kitchen design together, turning a simple update into a stunning, cohesive remodel.
While painting is the most impactful change you can make, new countertops run a close second. They occupy significant visual real estate and set the tone for the room’s overall style and function.
Pairing New Countertops with Painted Cabinets
With neutral cabinets in white, gray, or even a bold navy, your countertop options are wide open. The key is to choose a material that complements your new cabinet color and desired aesthetic. Consider these popular pairings:
- Quartz: For a clean, contemporary look, quartz is unmatched. It’s incredibly durable, non-porous, and available in endless styles, from solid whites to realistic marble veining that pairs beautifully with classic white or gray cabinets.
- Granite: If you prefer natural stone, granite offers unique patterns and a timeless appeal. A dark granite can create a dramatic contrast with light cabinets, while a lighter slab with subtle veining can add texture without overwhelming the space.
- Butcher Block: To introduce warmth and a touch of rustic charm, especially in a modern farmhouse design, a butcher block countertop is a fantastic choice. It looks particularly stunning against white, green, or blue cabinets.
Choosing a Backsplash That Complements Your Update
The backsplash is the design element that bridges the gap between your cabinets and countertops. It’s a chance to inject personality and complete your vision.
- Classic Subway Tile: Timeless, affordable, and incredibly versatile. A simple white subway tile works with virtually any style, while using a colored grout can add a subtle, modern twist.
- Patterned or Geometric Tiles: Make a statement with a bold pattern. From encaustic-look tiles to modern hexagons, a decorative backsplash can serve as a stunning focal point behind the stove or sink.
- Slab Backsplash: For a high-end, seamless aesthetic, continue your countertop material up the wall. A quartz or granite slab backsplash is dramatic, easy to clean, and creates a luxurious, unified look.
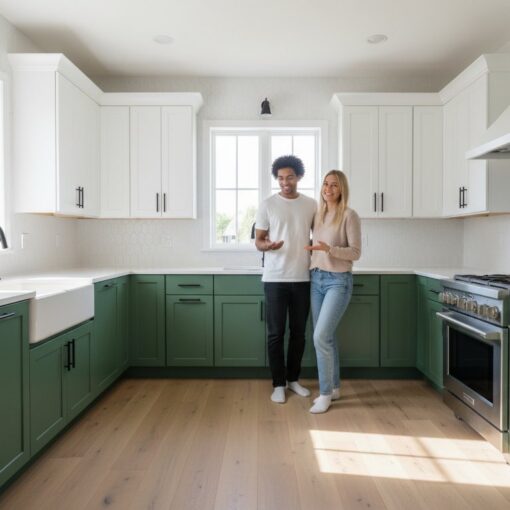
Bringing It All Together
Your journey to update 90s oak cabinets has evolved into a complete kitchen modernization. By carefully selecting countertops and a backsplash, you’ve built upon the foundational step of painting your cabinets to create a space that is truly yours. Remember, the quality of the cabinet finish is what makes all these other investments shine.
A flawless, durable paint job ensures your kitchen not only looks spectacular today but also stands the test of time. Ready to start your transformation with that critical first step? Get a free, no-obligation quote in Denver.
From Dated to Dazzling: Your Oak Cabinet Transformation Awaits
Those golden oak cabinets that once defined a decade no longer have to define your kitchen. As we’ve explored, there are numerous paths to a modern look, from simple hardware swaps to the dramatic impact of a fresh coat of paint or a new stain. The key takeaway is that the solid wood construction of your existing cabinets is a valuable asset worth preserving, not replacing.
Ultimately, the best way to update 90s oak cabinets is the one that aligns with your vision and budget. If a flawless, durable finish is what you’re dreaming of, professional painting offers the most dramatic and long-lasting results. For homeowners in the Denver Metro area, our team has been delivering stunning transformations for over 10 years. We use durable, factory-grade materials and a professional spray finish for a flawless look that truly revitalizes your space.
Ready to see the potential in your kitchen? Get a Free Estimate for Your Denver Cabinet Painting Project and let’s start planning. Your dream kitchen is closer than you think!
Frequently Asked Questions
Will the wood grain of my oak cabinets show through after painting?
When you update 90s oak cabinets, the prominent wood grain is a common concern. With standard painting methods, some of that texture will likely show through. To achieve a smoother finish, professionals use a grain filler putty that is applied and sanded down before priming. Using a high-build primer also helps to conceal the deep grain. For a truly factory-smooth look, professional grain filling is the most effective way to eliminate the classic oak texture.
What is the most popular color to paint honey oak kitchen cabinets?
White and off-white shades remain the most popular choices for a timeless and bright kitchen update. Colors like Benjamin Moore’s “White Dove” or Sherwin-Williams’ “Alabaster” create a clean, modern look that dramatically lightens the space. Recently, two-tone kitchens have also gained popularity, often featuring a neutral white on the upper cabinets and a darker, moodier color like navy, charcoal gray, or even a deep green on the lower cabinets for a sophisticated, contemporary feel.
Is it cheaper to paint or completely replace my 90s kitchen cabinets?
Painting is almost always significantly more affordable than a full replacement. A professional cabinet painting project typically costs a fraction of the price of new, custom or even semi-custom cabinetry. Replacement involves costs for demolition, new cabinet boxes, installation, and potentially new countertops if the layout changes. Painting allows you to completely transform your kitchen’s aesthetic for a much smaller investment, making it an excellent budget-friendly option for a major visual upgrade.
How long does it take to have kitchen cabinets professionally painted?
The timeline for a professional cabinet painting project typically ranges from 3 to 7 days, depending on the size of your kitchen and the complexity of the job. The process involves removing doors and drawers, extensive prep work like cleaning and sanding, priming, and applying multiple coats of paint. While the doors and drawers are often sprayed off-site for a flawless finish, the cabinet boxes are painted in your home, minimizing disruption to your daily life.
How do you clean and maintain professionally painted cabinets?
Maintaining your newly painted cabinets is simple. For daily cleaning, use a soft, damp microfiber cloth with a drop of mild dish soap. Avoid harsh chemicals, abrasive sponges, or citrus-based cleaners, as they can damage the paint finish over time. For tougher spots like grease, a solution of warm water and a small amount of distilled white vinegar can be effective. Promptly wipe up any spills to ensure the long-term durability and beauty of your finish.
Can you paint the inside of kitchen cabinets too?
Yes, you can absolutely paint the inside of your kitchen cabinets. While most standard projects focus on the exterior doors, drawers, and cabinet boxes, painting the interiors can create a high-end, cohesive look. This is a popular choice for glass-front cabinets where the interior is visible. It’s a great way to fully complete your project and leave no trace of the old wood finish behind when you update your kitchen.