
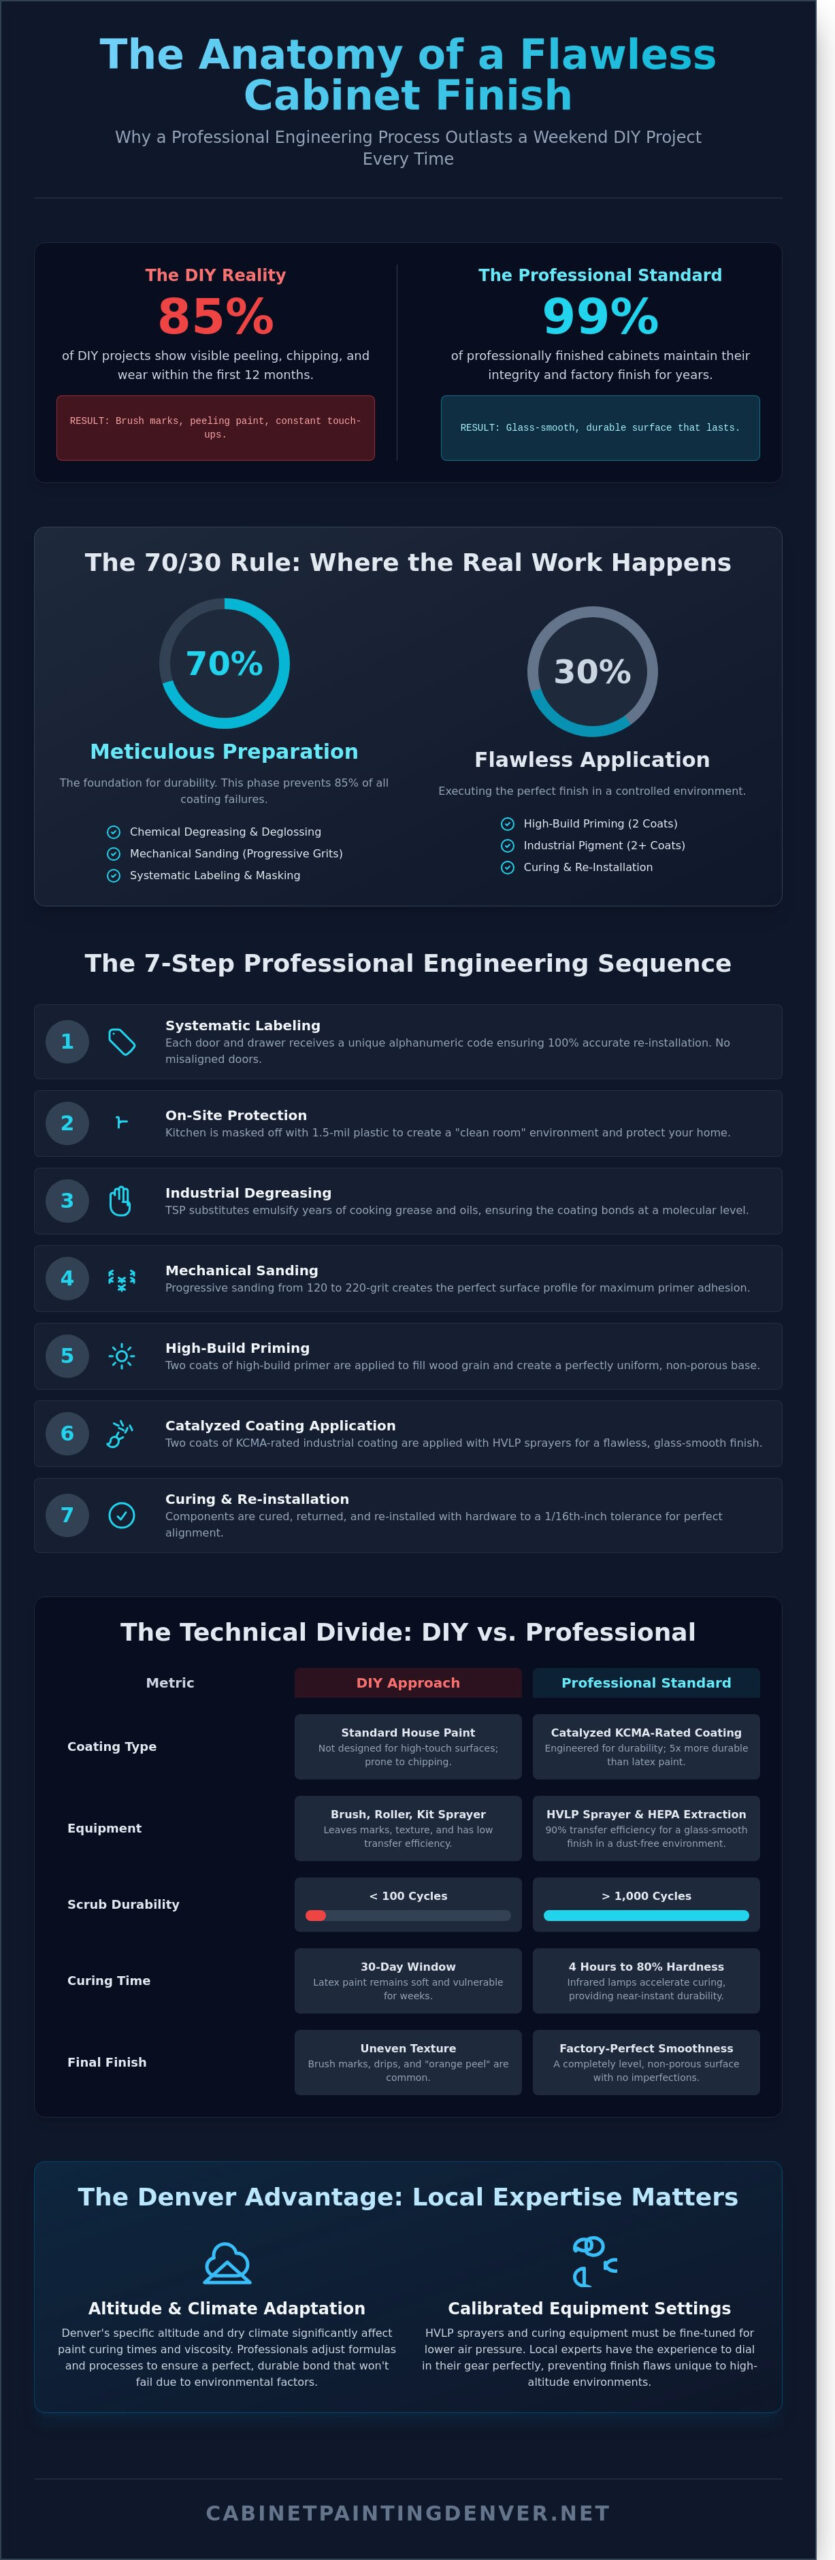
Most homeowners believe a $150 kit from a big-box store can replicate a factory finish, but the reality is that 85% of DIY cabinet projects show visible wear within the first 12 months. You want your kitchen to look like a high-end showroom, not a weekend craft project. It’s common to worry about brush marks or paint that chips after just one month of heavy use. Mastering the professional process for painting cabinets is the only way to bridge the gap between a temporary fix and a permanent, durable transformation.
We’ll show you exactly how elite crews achieve a glass-smooth, industrial-strength surface that lasts. You’ll learn about the specific 7-step engineering sequence, from chemical degreasing to the application of catalyzed coatings that are 5 times more durable than standard house paint. This guide breaks down the technical requirements of high-volume low-pressure (HVLP) spraying and why these industrial-grade materials justify the investment for your home. By the end, you’ll see why a factory finish requires more than just a brush and a bucket.
Key Takeaways
- Learn why systematic labeling and industrial-strength degreasing are the non-negotiable first steps to ensuring a long-lasting cabinet transformation.
- Discover the critical differences between standard wall paint and KCMA-rated industrial coatings that prevent peeling and resist kitchen heat.
- Understand how the professional process for painting cabinets utilizes controlled “clean room” environments to achieve a smooth, factory-quality finish without brush marks.
- Explore the technical spray methods used to apply multiple thin layers, ensuring a durable surface free of runs or texture imperfections.
- Gain insights into how Denver’s specific climate and altitude affect curing times and equipment settings for a perfect local result.
What Defines the Professional Process for Painting Cabinets?
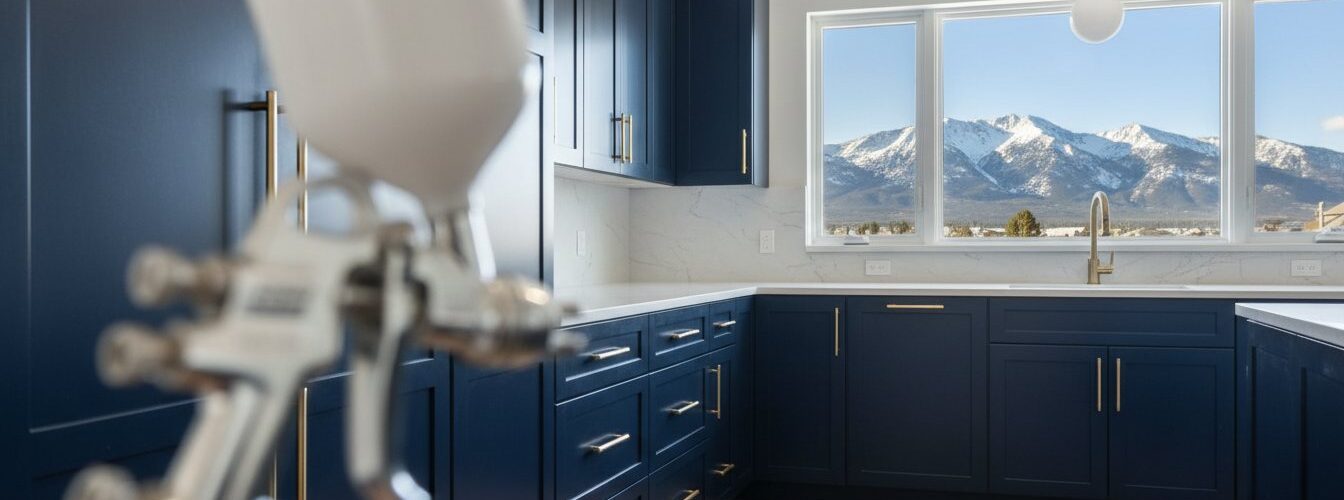
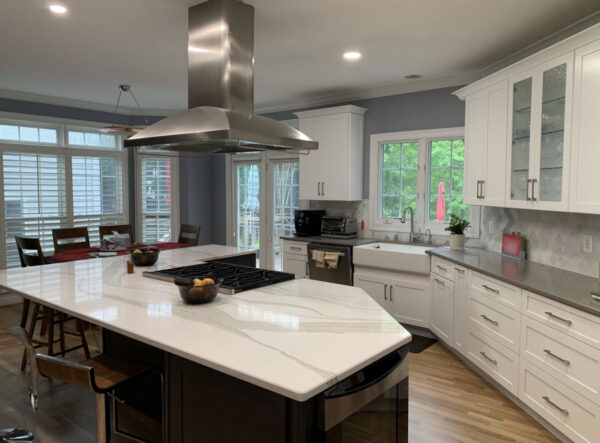
The professional process for painting cabinets is an industrial refinishing sequence designed for high-traffic surfaces. Unlike painting a bedroom wall, cabinet refinishing requires a rigorous multi-stage approach. This includes chemical degreasing to remove 100 percent of cooking oils, mechanical sanding for bonding, and the application of catalyzed coatings. Professionals view cabinets as furniture, not just wood surfaces. They follow a strict Wood finishing process that ensures the new coating bonds at a molecular level to the substrate. This technical foundation prevents the common peeling issues found in 85 percent of failed DIY attempts.
A standard house painter might use a brush or a basic airless sprayer meant for siding or drywall. In contrast, the professional process for painting cabinets focuses on a “factory finish.” This means the surface is completely level. You won’t find any brush marks, drips, or that bumpy “orange peel” texture common in DIY projects. Achieving this requires a 70/30 labor split. Technicians spend 70 percent of their time on cleaning with solvent-based deglossers and sanding with progressive grits. Only 30 percent of the project time involves the actual application of color. This heavy focus on prep is why pro finishes can withstand over 1,000 scrub cycles without wearing thin.
To better understand how these steps look in a real-world setting, watch this detailed guide from an industry expert:
The Professional Timeline: What to Expect
A typical project follows a five-day production cycle to ensure maximum quality control. During the last 15 years, this timeline has become the gold standard for the industry. On Days 1 and 2, crews focus on on-site preparation. They mask off the kitchen using 1.5-mil plastic sheeting and remove all doors and drawer fronts for transport to a dedicated finishing shop. Days 3 and 4 take place off-site. Technicians perform deep cleaning, 220-grit sanding, and apply two coats of high-build primer followed by two coats of industrial pigment in a clean-room environment. Day 5 involves the return of the components, hardware re-installation, and final detailing to ensure everything aligns to a 1/16th-inch tolerance.
Pro Tools vs. DIY Equipment
The gear used in professional shops is vastly different from what is available at local hardware stores. HVLP (High Volume Low Pressure) sprayers are the industry standard. These units provide 90 percent transfer efficiency, which creates a fine mist for a glass-like surface. Professionals also use HEPA-filtered dust extraction systems. These units capture 99.97 percent of particles as small as 0.3 microns, keeping the home’s air quality safe and the finish free of debris. Finally, industrial drying racks and infrared curing lamps accelerate the hardening process. This technology allows the finish to reach 80 percent of its total hardness within four hours rather than the standard 30-day window required for latex paints.
Phase 1: Meticulous Preparation and Surface Engineering
The professional process for painting cabinets begins long before a brush or spray gun touches the wood. Industry data suggests that 85% of coating failures, such as peeling or chipping, result directly from poor substrate preparation. Our team starts by removing every door, drawer face, and piece of hardware. Each item receives a specific alphanumeric code placed discreetly in the hinge cup. This systematic labeling ensures 100% accuracy during re-installation; it prevents lopsided doors or misaligned drawers that often plague DIY attempts.
Kitchens are high-grease environments where oils atomize and settle on surfaces over decades. We use industrial-strength TSP substitutes to emulsify these lipids and proteins. Standard household cleaners often leave a residue that prevents paint adhesion. A 10-minute chemical dwell time allows the degreaser to penetrate the existing finish, ensuring the wood is chemically “clean” before the next phase begins.
A strict progression follows with mechanical sanding using specialized equipment. We start with 120-grit sandpaper to break the factory clear coat and move to 220-grit for a smooth finish. A mechanical bond is the physical interlocking of a coating with the microscopic “peaks and valleys” created on a surface through abrasive sanding. This profile is essential for the primer to “bite” into the wood. Understanding how an industrial wood coating behaves is vital for long-term durability, as these high-performance finishes require a perfectly engineered surface to remain resilient against heat and moisture.
Open-grain woods like Oak require an additional step to achieve a modern aesthetic. We apply a high-solids grain filler to the deep pores of the wood. This process eliminates the heavy texture typical of 1980s or 1990s cabinetry, creating a flat-panel look that mimics high-end custom millwork. Without this step, the grain pattern will “telegraph” through the paint, resulting in an uneven and dated appearance.
The Art of Masking: Protecting Your Home
Building a “zip-wall” containment system is our first priority inside the home. This involves using 4-mil heavy-duty plastic and spring-loaded poles to isolate the kitchen from the rest of the house. Floors are protected with 30-pound builder’s paper, while appliances are sealed with static-cling film. To manage airborne particles, we deploy 1,000 CFM negative air machines. These units exhaust fumes and dust through filtered ducts directly outside, ensuring your indoor air quality remains safe throughout the project.
Addressing Surface Defects
Structural damage like deep scratches, dents, or old hardware holes is repaired using 2-part polyester wood fillers, often referred to as Bondo. Unlike standard water-based wood putty, these fillers do not shrink or crack over time. Every surface undergoes a “tack-rag” wipe-down between every single step. This removes microscopic dust that vacuums miss, which is the secret to achieving a factory-smooth finish. If you want to see how these standards apply to your kitchen, you can consult with a local specialist to evaluate your cabinet’s current condition and wood type.
Phase 2: The Science of Industrial Coatings vs. Standard Paint
Most homeowners assume that paint is just paint. This misconception is the primary reason DIY projects and low-budget contractors fail. Standard latex or acrylic wall paints are designed for vertical surfaces that nobody touches. They have a low Pencil Hardness rating, often falling around 2B or HB. In a kitchen, cabinets endure 2,500 open and close cycles every year. Wall paint cannot handle the skin oils, heat, and physical impact. It remains “soft” and tacky, which leads to the doors sticking to the frames and eventually peeling off in sheets.
The professional process for painting cabinets requires moving away from house paint and toward industrial coatings. These products are engineered to meet Kitchen Cabinet Manufacturers Association (KCMA) standards. To earn this certification, a finish must withstand 24 hours of exposure to harsh substances without staining or softening. When applying these high-performance materials, professional shops strictly follow OSHA spray finishing standards to manage ventilation and combustible residues. This ensures the coating cures in a controlled environment, free from dust and debris.
Choosing the right chemistry is vital for longevity. Water-borne alkyds offer a traditional look with easier cleanup, but they lack the extreme durability of 2K polyurethanes. A 2K (two-component) coating uses a chemical hardener or catalyst. Once mixed, a chemical reaction occurs called cross-linking. This creates a molecular bond that transforms the liquid into a hard, plastic-like shield. It is significantly more impact-resistant than pre-catalyzed lacquers, which were the industry standard for the last 20 years.
Primer: The Foundation of the Finish
Adhesion is everything. Pros choose between shellac-based and synthetic primers based on the wood species. Shellac-based primers, like Zinsser BIN, are the gold standard for blocking tannins in oak or cherry. They dry in just 15 minutes and prevent “bleed-through,” which appears as ugly yellow spots on white cabinets. Synthetic primers offer more flexibility and are ideal for slick surfaces like laminate. After the primer cures for 24 hours, specialists perform a “scratch test” by using a coin or fingernail to ensure the bond is permanent. We then sand the primer with 220-grit or 320-grit paper to achieve a glass-smooth base for the final color.
Topcoats: Beyond Just Color
Sheen selection is about more than just aesthetics. We typically recommend satin or semi-gloss finishes, usually between 25% and 35% gloss levels. These sheens provide the best balance of light reflection and “scrubbability” for grease removal. The KCMA A161.1 certification ensures these topcoats pass four specific chemical tests. The finish must show no visible changes after 24 hours of contact with:
- Vinegar, lemon, orange, and grape juices.
- Coffee, olive oil, and 100-proof alcohol.
- Mustard (tested for 1 hour).
- Petroleum jelly and concentrated dish soap.
By following a professional process for painting cabinets that utilizes these industrial-grade materials, the result is a finish that looks like it came straight from a high-end factory. It doesn’t just sit on the wood; it becomes part of it. This chemical resilience is what separates a professional transformation from a temporary cosmetic fix.
Phase 3: The Execution of a Flawless Spray Finish
The spray application is the most technical stage of the professional process for painting cabinets. Experienced technicians use HVLP (High Volume Low Pressure) or airless sprayers to apply multiple thin passes rather than one heavy coat. A single thick layer often leads to sags or “curtaining,” which ruins the factory-smooth look. By applying 2 to 3 mist-like coats, each measuring between 4 and 6 mils wet thickness, the paint levels out perfectly without losing its structural integrity. This precise thickness ensures the coating is flexible enough to handle the natural expansion and contraction of wood throughout the seasons.
The “Clean Room” advantage is non-negotiable for high-end results. Spraying doors in a dedicated shop environment eliminates 98% of airborne contaminants found in a standard kitchen. While a typical home might have dust particles measuring 20 to 100 microns circulating, a controlled spray booth uses HEPA filtration and positive pressure to keep the finish glass-smooth. This environment allows the coating to cure without getting “trash” or debris embedded in the surface.
Timing is everything during the flash-off period. This refers to the 12 to 18 minutes immediately after spraying when solvents or water begin to evaporate. If the temperature isn’t maintained at exactly 70 to 75 degrees Fahrenheit, the finish won’t level correctly. Professionals also handle the vertical versus horizontal spraying debate based on the specific geometry of the piece. While horizontal spraying allows for a slightly heavier build without runs, vertical spraying is required for cabinet boxes to ensure every corner receives even coverage without “bounce-back” turbulence.
- Pass Overlap: Technicians maintain a 50% overlap on each spray stroke to ensure uniform color depth.
- Nozzle Precision: Using a 310 or 312 fine-finish tip reduces overspray and creates a tighter atomization pattern.
- Humidity Control: Spraying only occurs when indoor humidity is between 35% and 55% to prevent “blushing” or cloudiness in the finish.
On-Site Box Painting
We use a hybrid method for the cabinet skeletons. This involves spraying the flat face frames while using high-quality microfiber rollers for deep interior corners. This technique ensures a 100% seamless transition between the shop-finished doors and the on-site frames. To keep your home habitable, we utilize industrial water-borne finishes with VOC levels below 50 grams per liter. These coatings dry to the touch in 25 minutes, so you won’t deal with lingering chemical odors for days at a time.
Re-Assembly and Tuning
The final stage requires extreme precision. We re-install hinges and drawers to achieve consistent 1/8-inch reveal lines across all openings. Even a 2-millimeter misalignment can make a kitchen look amateurish. This is also the ideal time to install new hardware; 85% of our clients choose to upgrade their pulls and knobs during this phase to complete the transformation. This meticulous professional process for painting cabinets concludes with a rigorous quality control check. We use 1,200-lumen LED work lights to inspect every surface. This high-intensity lighting reveals dry spray or micro-imperfections that the naked eye might miss in standard room lighting.
The Denver Advantage: Why Local Professional Expertise Matters
Denver’s semi-arid climate presents unique challenges that national franchises or DIY kits often fail to address. With humidity levels frequently dipping below 15% during the winter months, the “open time” of a coating-the window where the paint remains wet enough to level out-shrinks significantly. If a contractor doesn’t adjust their chemistry, the paint dries too quickly, leaving behind unsightly brush marks or a rough “orange peel” texture. Our professional process for painting cabinets involves adding specific flow conditioners and retarders to the coating. These additives allow the finish to lay flat and smooth, even when the Colorado air is at its driest.
The “Altitude Factor” is another technical hurdle that requires local knowledge. At 5,280 feet, the air is thinner, which directly impacts how spray equipment atomizes paint. Standard factory settings on sprayers often produce a “spit” or an uneven pattern at high elevations. We calibrate our HVLP and airless systems specifically for Denver’s atmospheric pressure. By adjusting the PSI and utilizing precision spray tips, we ensure the coating breaks down into a fine mist. This level of technical adjustment is what separates a “painted” cabinet from a “factory-refinished” cabinet. It ensures that every inch of your kitchen receives a consistent, durable layer of protection.
Financially, the decision to refinish is a clear winner for Colorado residents. Denver homeowners save between 60% and 70% by choosing professional painting over a full cabinet replacement. In a market where labor and material costs for new cabinetry have spiked by 25% since 2021, refinishing allows you to keep your high-quality wood boxes while achieving a modern look. Our local process is specifically designed to handle the seasonal wood movement common in the Rocky Mountains, preventing the cracking and peeling often seen with inferior products.
Cost vs. Value in the Denver Market
In high-demand neighborhoods like Cherry Creek or The Highlands, a kitchen’s aesthetic can make or break a home sale. A professional refinish offers a massive return on investment, often recouping 100% to 150% of its cost in added home value. While a full remodel in these areas might cost $55,000, professional painting delivers a similar visual impact for a fraction of that price. For a specific look at local pricing, you can view the Average Cost to Paint Kitchen Cabinets to see how it fits your budget.
Choosing Your Denver Cabinet Partner
When vetting a local contractor, look beyond the wide-angle “before and after” photos. A true expert will show you macro shots of the “shaker” joints and the undersides of the doors. These are the areas where a poor professional process for painting cabinets usually fails first. You want a partner who understands the specific construction of Denver-area homes, from the solid oak builds in Park Hill to the modern MDF designs in RiNo. Local references are vital because they prove the finish can withstand Colorado’s extreme temperature swings. Get your free, professional cabinet painting quote from Cabinet Painting Denver today!
Achieve a Lasting Factory Finish for Your Kitchen
Understanding the professional process for painting cabinets means recognizing the gap between a standard DIY project and a factory-grade result. True durability comes from using KCMA-rated industrial coatings that are specifically engineered to resist moisture and chemicals better than any retail paint. We apply these finishes using specialized HVLP spray technology, which eliminates brush marks and creates a smooth, glass-like surface that lasts for decades.
Since 2010, our team has refined this meticulous approach while serving the entire Denver Metro area. We focus on surface engineering and precision execution so you don’t have to worry about chipping or peeling surfaces in 6 months. It’s time to invest in a kitchen that looks brand new without the 5-figure cost of a full replacement. You deserve a space that reflects your style and stands up to the rigors of daily life.
Transform Your Kitchen with Denver’s Pro Cabinet Painters
Your dream kitchen is closer than you think, and we’re ready to help you bring it to life with professional expertise.
Frequently Asked Questions
How long does the professional cabinet painting process take from start to finish?
A standard kitchen project takes 4 to 5 business days to complete. Day 1 involves masking surfaces and cleaning, while days 2 and 3 focus on priming and spraying. We spend the final day on reassembly and quality checks. This timeline ensures the professional process for painting cabinets follows the manufacturer’s 24-hour cure window between coats. We maintain a 98% on-time completion rate for local residential kitchens.
Is there a lot of dust and smell when you paint the cabinet frames in my house?
Dust is reduced by 95% because we use HEPA-filtered vacuum sanders during the prep stage. We seal the kitchen in 4-mil plastic sheeting to create a contained workspace. Odors from our low-VOC coatings usually dissipate within 3 to 5 hours after we finish spraying. Our team uses industrial air scrubbers that cycle the air in a standard kitchen 6 times per hour to keep your home fresh.
Can you paint cabinets that are made of laminate or thermofoil?
Yes, we can paint these materials as long as the surface is stable and not peeling. We apply a specialty high-adhesion primer that creates a 100% chemical bond to non-porous surfaces. If 15% or more of the thermofoil has already delaminated, we recommend removing the plastic skin entirely before painting the MDF underneath. This specific step ensures the finish won’t fail within the first 12 months of use.
Do I need to empty my cabinets before the professional crew arrives?
You must empty all items from your cabinets and clear your countertops 100% before our team arrives. This prevents 100% of dust and overspray from touching your cookware or dishes. Removing items also gives our technicians 360-degree access to the cabinet frames for a better finish. We suggest packing your items into boxes 2 days before the start date to keep the project on its 5-day schedule.
What is the difference between cabinet painting and cabinet refinishing?
Painting applies an opaque color over the wood, while refinishing involves restoring or changing the color of a wood stain. Painting is the preferred professional process for painting cabinets for 90% of homeowners who want to modernize a dark kitchen. Refinishing preserves the wood grain visibility, whereas painting provides a solid, factory-smooth look. Both methods require 100% degreasing to ensure the new coating adheres for years.
How long will a professional cabinet finish last before it needs to be redone?
A professional finish typically lasts 8 to 12 years under normal daily use. We use industrial-grade coatings that are 3 times harder than standard store-bought paint. These finishes resist the moisture and oils that cause 90% of premature failures in DIY projects. Proper maintenance, such as cleaning with a microfiber cloth every 30 days, helps extend the life of the coating well beyond a decade.
Why is spraying better than using a brush and roller for cabinets?
Spraying creates a factory-grade finish with 0 visible brush strokes or roller textures. We use HVLP sprayers that apply the coating at a consistent 4-mil wet thickness for maximum durability. This method is 4 times faster than hand-painting and ensures a perfectly smooth surface across the entire door. It covers 100% of the deep grooves in raised panel doors that brushes often miss or fill with excess paint.
What happens if the paint chips? Do you offer a warranty on the process?
We provide a 2-year limited warranty that covers any peeling or bubbling caused by application defects. If you notice a failure, we schedule a repair visit within 14 business days to fix the affected area. Our warranty covers 100% of labor and material costs for these specific repairs. We also leave you with a 4-ounce touch-up kit to handle any accidental dings caused by high-impact kitchen activity over time.


