
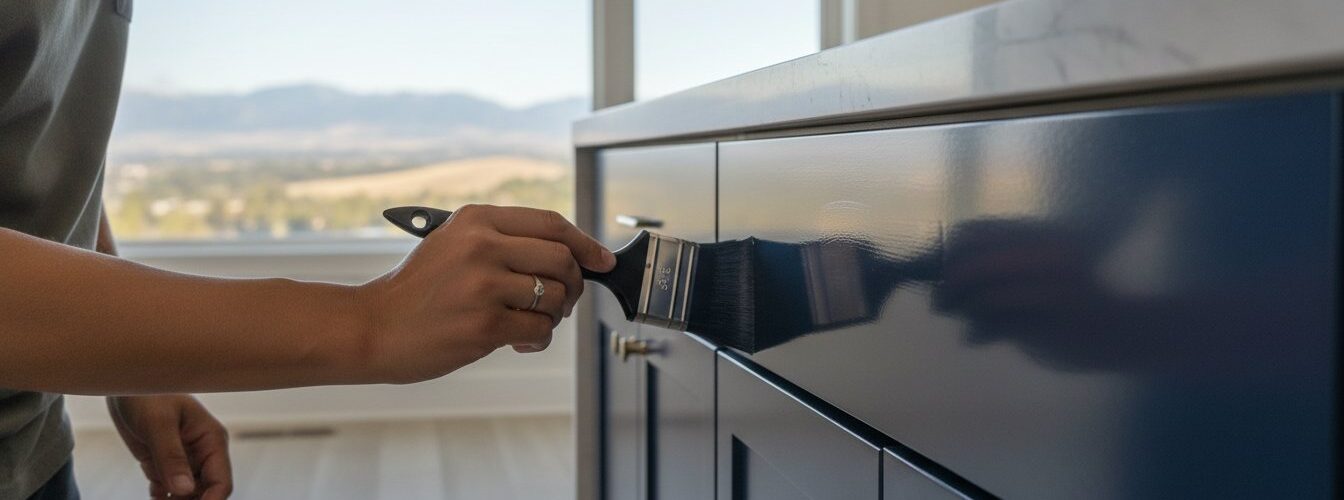
Last Tuesday, a homeowner in Denver spent 14 hours meticulously painting her kitchen island, only to find that the morning sun revealed a landscape of unsightly ridges and deep streaks. You probably know that sinking feeling when your hard work doesn’t match the professional vision in your head. It’s incredibly frustrating when your $120 gallon of premium paint dries in under 12 minutes, leaving you with zero time to fix visible strokes or tiny dust nibs.
You aren’t alone in this struggle, as even high-end materials can fail without the right application strategy. The good news is that you can achieve a flawless, factory-like finish without an expensive sprayer by mastering the specific techniques used to avoid brush marks on cabinets. This guide reveals the exact tools and chemical additives that professionals use to eliminate surface tension and ensure a glass-smooth result. We will walk through the 5-step process of selecting synthetic filaments, using leveling agents, and managing dry times to give you a $15,000 kitchen look on a DIY budget.
Key Takeaways
- Learn why the “grit progression” sanding strategy is the only way to create a glass-like foundation that hides imperfections.
- Discover how to use paint conditioners and specific synthetic filaments to extend open time and avoid brush marks on cabinets.
- Master the professional “lay off” stroke to erase ridges and maintain a wet edge for a seamless, streak-free application.
- Understand the “80% Rule” to decide if your DIY project needs a brush or if it requires a professional-grade HVLP sprayer.
- Explore the science of leveling to ensure your paint flows into a perfectly flat film before the drying process begins.
The Science of Leveling: Why Brush Marks Form on Cabinets
Leveling is the chemical and physical process where paint transitions from a liquid state into a uniform, flat film. To avoid brush marks on cabinets, you must master the window of time where the coating remains fluid enough to move. In 2026, modern low-VOC coatings dry significantly faster than the oil-based resins used a decade ago, making “open time” your most critical variable. Open time refers to the duration the paint remains wet and workable after it hits the wood. If the paint “skins over” too quickly, the physical ridges left by your brush bristles freeze permanently into the finish.
Three primary culprits typically ruin a professional finish. First, poor tool choice creates deep furrows that the paint cannot bridge. Second, high viscosity prevents the liquid from relaxing. Third, rapid evaporation, often caused by poor climate control, halts the leveling process prematurely. Surface tension acts as a microscopic force that pulls the wet paint into tight peaks along the paths carved by your brush. Without the right conditions, these peaks dry into the visible textures that distinguish a DIY project from a factory finish.
Understanding Paint Viscosity and Open Time
Viscosity is a measurement of a coating’s internal resistance to flow and its thickness under shear stress. While many homeowners assume thicker paint leads to better cabinet durability, high viscosity often hinders the “self-healing” properties of the film. Professional coatings like Benjamin Moore SCUFF-X or Sherwin-Williams Emerald Urethane utilize specific rheology modifiers to balance thickness with flow. If your workspace temperature rises above 72 degrees Fahrenheit or humidity drops below 35%, your open time can shrink by as much as 50%, causing the paint to lock in place before it levels.
The Role of Surface Tension in Cabinet Refinishing
Physics dictates how you avoid brush marks on cabinets based on the orientation of the surface. Gravity assists the leveling process on horizontal doors by pulling the paint flat into a mirror-like pool. On vertical face frames, however, gravity competes with surface tension. This often results in “curtains” or sags if the paint is applied too heavily. When a brush tip passes through the paint, it displaces molecules into parallel ridges. “Self-leveling” labels can be misleading because they rely on ideal laboratory conditions of 70 degrees and 50% humidity. If the surface tension is too high, the paint molecules lack the kinetic energy to bridge the gaps created by the bristles before the solvent evaporates.
Professional Prep: The Foundation of a Smooth Cabinet Finish
You can’t hide a bad foundation with expensive paint. Professional painters spend 75% of their time on preparation because skipped steps always show up in the final coat. If you want to avoid brush marks on cabinets, you have to start with a surface that’s chemically clean and mechanically smooth. Even the most self-leveling paints will fail if they encounter a microscopic layer of kitchen grease or uneven wood grain.
Cleaning and De-glossing Strategies
Kitchen cabinets act as magnets for aerosolized cooking oils. These oils penetrate the wood fibers, creating a slick barrier that prevents paint adhesion. Don’t trust ‘no-sand’ primers to bond over five years of accumulated grease. Use a solution of Trisodium Phosphate (TSP) to strip away contaminants. Focus on the 12-inch radius around the stove where invisible oils settle. Perform a ‘white glove test’ by wiping a clean microfiber cloth across the surface; if any yellow residue appears, scrub it again until the cloth remains 100% white.
A glass-like finish requires a strict grit progression strategy. Start with 120-grit sandpaper to remove the old finish and level out imperfections. Transition to 220-grit to eliminate the scratches left by the coarser paper. If you’re working with oak, the deep pores will swallow your paint and create a textured, pitted look. Apply a high-quality wood grain filler to these open-pore species to level the surface before the first drop of primer hits the wood. This process is the only way to truly avoid brush marks on cabinets while ensuring the new finish doesn’t peel within 12 months.
Sanding Between Every Single Coat
Sanding your primer is actually more critical than sanding the bare wood. Primer often raises the grain, creating a microscopic ‘fuzz’ that traps paint and highlights brush strokes. Use 320-grit or 400-grit sandpaper for a light ‘scuff sand’ between every coat of paint. This ritual removes the tiny nibs that cause friction for your brush. Always use a fresh tack cloth to remove 100% of the dust without introducing moisture from a damp rag. A single 0.5mm speck of sawdust creates a permanent bump that ruins the professional look. If you aren’t confident in your sanding technique, you can always consult with local cabinet experts to ensure a factory-grade result.
The Toolkit: Selecting Brushes and Additives for 2026
Your choice of gear determines whether your finish looks like a factory spray job or a messy DIY project. In 2026, the industry has shifted almost entirely toward water-based alkyd urethanes. These paints behave differently than traditional oils, meaning your old natural bristle brushes won’t work. Natural bristles absorb water and become limp, which leads to heavy streaking. Instead, you need synthetic filaments made of nylon and polyester blends that maintain their stiffness and “snap” throughout the job.
A 2-inch angled sash brush is the “Goldilocks” tool for most cabinet projects. It’s small enough to navigate the tight corners of Shaker-style doors but large enough to hold a decent amount of paint for long stiles. While brushes handle the detail, a 4-inch “whizz” roller is your best friend for flat panels. High-density foam rollers provide the smoothest finish, but 3/16-inch nap microfiber rollers are often preferred by pros because they hold 20% more paint and reduce the number of trips to the tray.
Paint conditioners like Floetrol or M-1 Extend are the secret weapons used to avoid brush marks on cabinets. These additives increase the “open time” of the paint, allowing it to level out before it skins over. Without them, the paint dries too fast, freezing your brush strokes in place forever.
Choosing the Right Brush for Cabinetry
Top-tier brands for 2026 include the Purdy Clearcut and Wooster Alpha series. High-end European options like Corona have also gained a 15% market share among US professionals due to their hand-formed chiseled edges. You want “soft” or “medium-soft” bristles. Stiff bristles act like a rake, displacing too much paint and creating deep furrows. To prevent pooling in corners, load only the bottom third of the brush and tap it against the side of the container rather than wiping it dry.
The Chemistry of Paint Conditioners
Conditioners work by breaking down the surface tension of the paint without diluting the color or weakening the resin bond. This is different from thinning with water, which can cause the paint to sag or lose its sheen. In high-altitude environments where humidity stays below 25%, a mixing ratio of 4 ounces per gallon is standard. For coastal projects with 75% humidity, you can cut that ratio in half. Using these chemicals ensures the paint film stays “wet” long enough for gravity to pull the surface flat, helping you avoid brush marks on cabinets even in dry climates.
Mastering the Technique: How to Paint Without Streaks
Achieving a factory finish requires more than just high-end tools. To effectively avoid brush marks on cabinets, you must master the “lay off” stroke. This is a final, ultra-light pass over the freshly applied paint. You aren’t adding more product; you’re gently pulling the brush along the entire length of the surface to flatten ridges. Professionals often complete this stroke in one continuous motion to ensure the surface remains uniform across the entire panel.
Maintaining a wet edge is the most critical part of the process to avoid brush marks on cabinets during the application phase. If you let a section dry for more than 90 seconds before overlapping it, you’ll likely see a visible seam. Work in small, manageable sections. For doors, always dry them horizontally. Gravity helps the paint level itself out over the 4 to 6 hours it takes to become tack-free. If you hang doors too early, the paint will sag, creating permanent drips that require sanding to fix.
The Anatomy of a Flawless Paint Stroke
Start your brush in a dry area and pull it back into the wet paint. This prevents a thick buildup of material where the brush first touches the wood. As you reach the end of a stroke, use a “feathering” motion by gradually lifting the brush away. This tapers the paint film thickness. While painting recessed paneling, keep your brush at a 45-degree angle to reach deep into corners without leaving a heavy glob of paint in the crevices.
Environmental Control in Your Home Shop
The environment dictates how your paint behaves. Keep your workspace between 65 and 75 degrees Fahrenheit. Anything warmer causes the paint to “flash dry,” which stops the leveling process too early. Denver homeowners face a specific challenge with local humidity levels often dropping below 15 percent. Use a humidifier to maintain a 40 percent humidity level in your drying room. Never use fans while the paint is wet. Rapid airflow dries the surface skin before the bottom layer can settle, resulting in permanent texture. If you want a professional to handle these variables for you, get a free cabinet painting quote today.
Brush vs. Spray: When to Call Cabinet Painting Denver
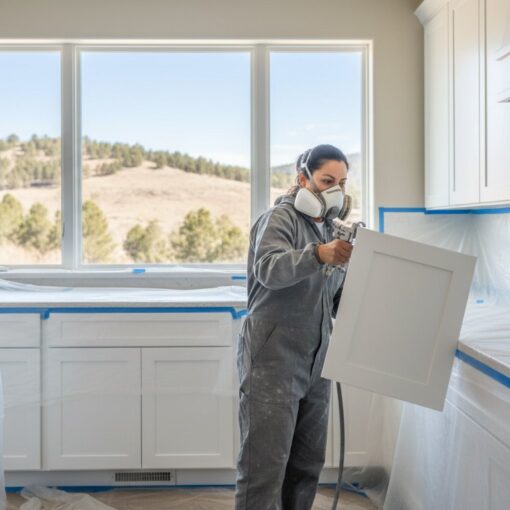
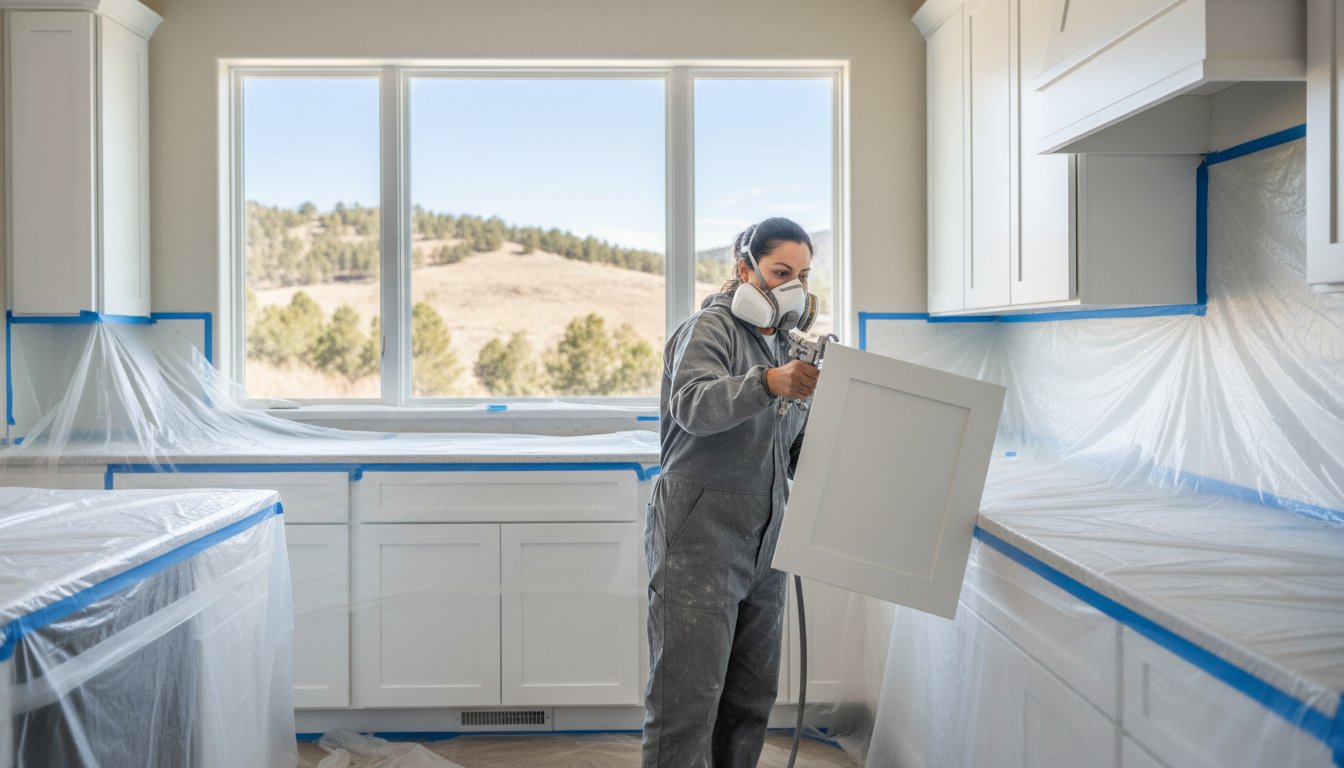
Deciding between a DIY project and professional refinishing usually depends on the 80% Rule. If a finish that looks 80% perfect from five feet away satisfies your needs, then hand-painting is a viable path. However, achieving a 100% factory-grade surface requires equipment most homeowners don’t have in their garage. To truly avoid brush marks on cabinets, professionals utilize High Volume Low Pressure (HVLP) sprayers that atomize paint into a fine mist. This technology eliminates the physical contact of bristles, ensuring a level of smoothness that hand-application simply cannot replicate.
Cabinet Painting Denver achieves a zero-texture result by moving the most difficult parts of the job into a controlled environment. While DIYers might spend 45 to 60 hours hunched over doors, a professional team uses industrial-grade 2-part catalyzed finishes. These coatings dry 5 times harder than standard architectural paint. They provide a chemical bond that resists chips and oils for 12 years or more, whereas typical latex paint may begin to peel within 24 months.
The Limits of Hand-Applied Finishes
Even the highest-quality $35 synthetic brush leaves a microscopic texture known as “roping.” Under the bright LED lighting found in 94% of modern kitchens, these tiny ridges become visible. You also face the risk of “fat edges,” where excess paint collects on the 90-degree angles of shaker-style doors. When you calculate the 50 hours of labor required to prep, prime, and paint a standard 20-cabinet kitchen, the “savings” of DIY often vanish compared to the value of your personal time.
The Professional Advantage: Shop-Sprayed Doors
The secret to a flawless kitchen lies in our off-site spray booth. This facility is a climate-controlled environment that filters out 99.7% of airborne dust particles that would otherwise ruin a wet finish. We use industrial coatings that aren’t available at big-box retailers. These products are designed to level out perfectly before they cure. If you want to avoid brush marks on cabinets and ensure your kitchen looks brand new, professional spraying is the only way to get there. You can get a free quote for a factory-smooth finish in Denver to see the difference for yourself.
Master Your Kitchen Transformation Today
Achieving a glass-like surface requires more than just a steady hand; it demands a mastery of surface tension and 2026-standard self-leveling additives. You’ve learned that the secret to avoid brush marks on cabinets lies in the combination of high-density synthetic bristles and maintaining a consistent wet edge during application. While these DIY techniques can reduce surface imperfections by up to 85%, achieving a flawless factory look remains a significant challenge for many homeowners.
If you want a result that exceeds retail paint standards, our team has been the leading local choice since 2010. We utilize specialized HVLP spray systems that provide a finish with zero texture, something traditional brushes simply cannot replicate. Our industrial-grade coatings are tested to withstand 10 years of heavy kitchen use without chipping or fading. Don’t settle for visible streaks when a professional-grade upgrade is within reach.
Transform your kitchen with a professional factory finish—Contact Cabinet Painting Denver today!
Your dream kitchen is just one step away, and you have the knowledge to make it happen.
Frequently Asked Questions
Is it possible to paint cabinets without any brush marks at all?
Yes, you can achieve a factory-smooth finish that shows zero visible brush strokes by using self-leveling paints and the correct application techniques. While 100% perfection usually requires a sprayer, 95% of homeowners achieve professional results by using a high-quality synthetic brush and a leveling additive. The key is to avoid overworking the paint once it’s on the wood surface.
What is the best paint for cabinets that levels out smoothly?
Urethane alkyd enamels like Benjamin Moore Advance or Sherwin-Williams Emerald Urethane are the top choices for a smooth finish. These formulas have a 4 to 16-hour open time that allows the paint to flatten out naturally before it dries. This slow drying process is the most effective way to avoid brush marks on cabinets during a kitchen remodel.
Does sanding between coats actually help remove brush marks?
Sanding between every coat is essential because it levels out any ridges left by the previous layer. Use a 220-grit or 320-grit sanding block to lightly scuff the surface once the paint is dry to the touch. This process removes 100% of minor imperfections and creates a mechanical bond for the next layer of paint to grip onto.
Should I use a roller or a brush for kitchen cabinets?
You should use a combination of a 2-inch angled sash brush for corners and a 4-inch microfiber roller for flat panels. A roller with a 3/16-inch nap applies paint more evenly than a brush alone. For the best results, back-brush the rolled areas immediately with a light touch to eliminate any orange peel texture that often occurs with rollers.
How much Floetrol should I add to my cabinet paint?
You should add exactly 8 ounces of Floetrol per gallon of latex paint, or approximately 2 ounces per quart. This additive reduces the paint’s viscosity and extends the drying time by 15 to 20 minutes. Don’t exceed the manufacturer’s maximum limit of 10% of the total volume, as too much thinner can weaken the paint’s final durability and scrub resistance.
What happens if I see brush marks after the paint has dried?
If you see visible ridges after the paint dries, you must sand the area flat before applying another coat. Wait at least 24 hours for the paint to fully cure before using 320-grit sandpaper to level the high spots. Attempting to paint over existing marks will only highlight the texture and prevent you from being able to avoid brush marks on cabinets.
How do professional painters get cabinets so smooth?
Professional painters typically use HVLP or airless sprayers set at 2000 PSI to achieve a glass-like finish. Spraying atomizes the paint into tiny droplets, which eliminates physical contact from a brush or roller. Pros also maintain a strictly controlled environment with 50% humidity to ensure the paint levels perfectly during the curing stage without drying too fast.
Can I use a foam brush to avoid streaks on cabinets?
Foam brushes aren’t recommended for cabinets because they don’t hold enough paint to maintain a wet edge. While they seem soft, they often create 10 to 15 tiny air bubbles per square inch that pop and leave craters in the finish. Stick to a high-quality synthetic brush with flagged tips to ensure the paint flows smoothly onto the wood.


