
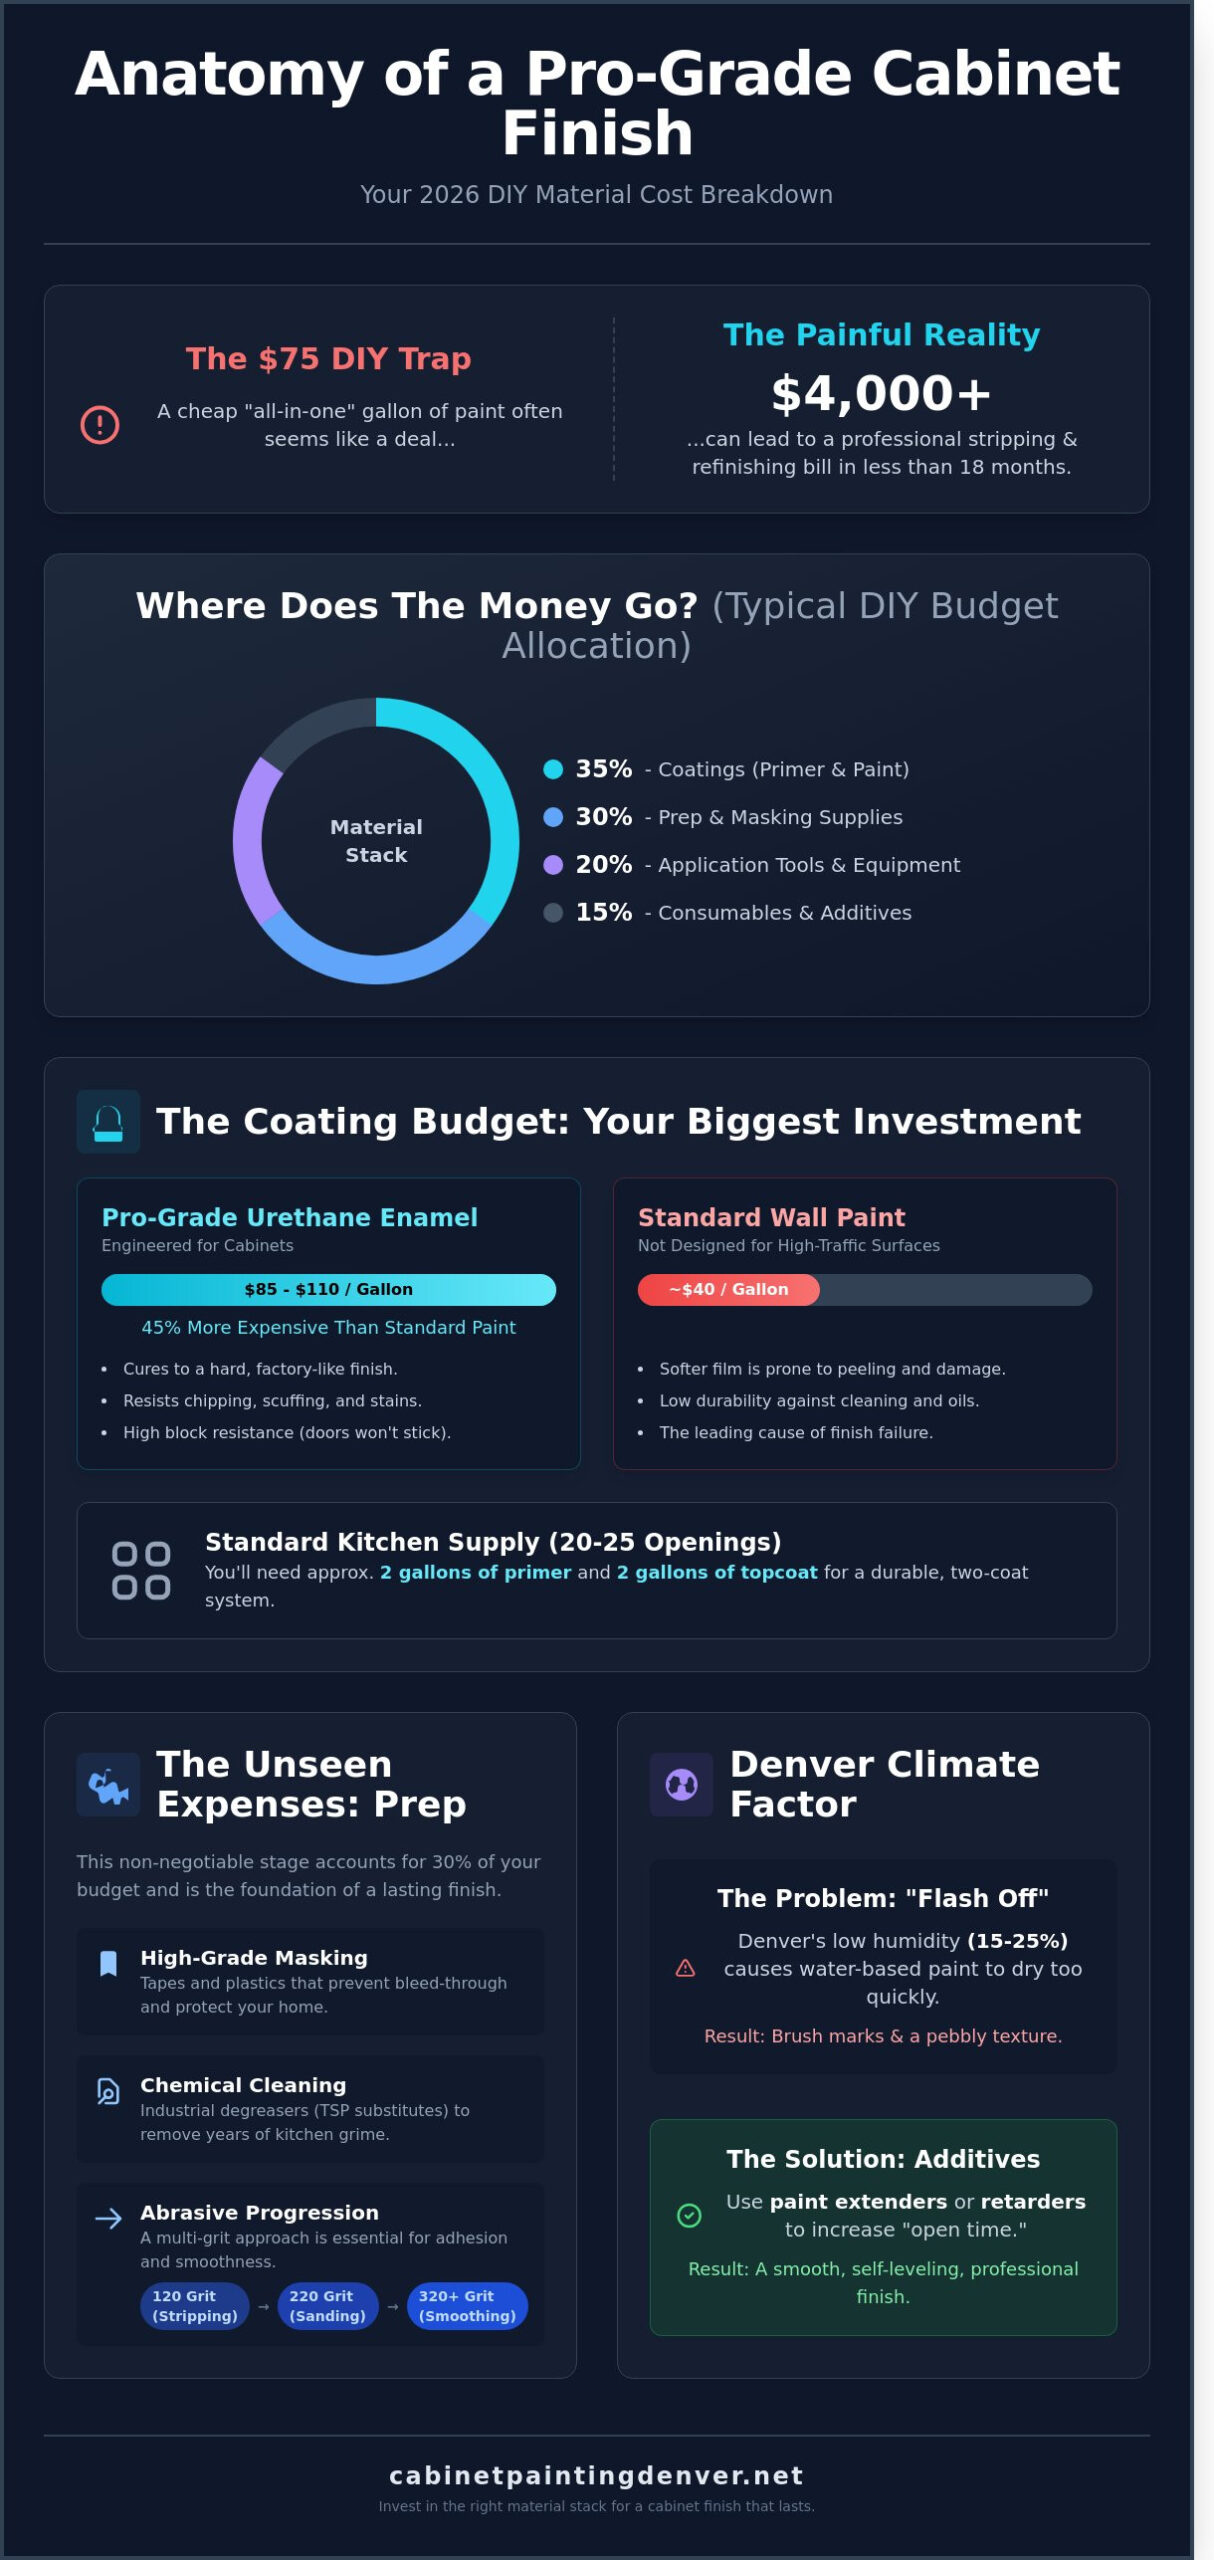
Why does a $75 gallon of “all-in-one” paint often result in a $4,000 professional stripping and refinishing bill less than 18 months later? It is a painful lesson many homeowners learn when they prioritize a low initial price over the specialized chemistry required for high-traffic kitchen surfaces. You likely already know that quality matters, but the sticker shock of 2026 pricing for premium primers and topcoats can still feel like a punch to the gut. Understanding the true materials cost for cabinet painting is the only way to avoid mid-project budget collapses or, worse, a finish that peels off your oak or laminate doors by next summer.
I promise to show you the exact breakdown of what it takes to achieve a professional-grade result, from the hidden expense of high-grit abrasives to the specific bonding agents that actually stick to modern substrates. We will look at why professional-grade coatings now represent 35% of a typical DIY budget and which “sundries” you simply cannot afford to skip. This guide provides a realistic 2026 shopping list so you can shop with confidence and ensure your kitchen transformation survives the daily wear and tear of a busy home.
Key Takeaways
- Learn why specialized cabinet coatings and high-adhesion primers are essential investments that differ significantly from standard wall paint.
- Understand how preparation and masking supplies can account for 30% of your total materials cost for cabinet painting, ensuring a professional-grade containment zone.
- Compare the long-term value of manual application tools against professional sprayers, including the hidden maintenance costs of specialized equipment.
- Discover how to avoid the “waste factor” by accurately calculating supply needs for a standard kitchen to prevent overbuying or ruining expensive materials.
What Defines the Materials Cost for Cabinet Painting?
Calculating the materials cost for cabinet painting involves more than just picking a color at the local hardware store. Professionals refer to this as the “material stack.” This comprehensive list includes everything from industrial-strength degreasers to precision abrasives and high-performance architectural coatings. In 2026, homeowners face a market where chemical supply chain shifts have prioritized durability over low-cost fillers, making the initial shopping list a significant part of the total project investment.
The total volume of supplies depends heavily on your kitchen’s footprint. A standard kitchen with 20 to 25 openings requires roughly two gallons of primer and two gallons of topcoat. However, a large Denver suburban kitchen with 50 or more doors can easily double those requirements. This volume increase doesn’t just apply to paint; it scales the cost of masking tape, protective plastic, and sanding discs proportionally. Larger projects also require more frequent replacement of consumables to maintain a clean workspace.
To better understand how these material and labor factors influence the final price, watch this helpful video:
The 4 Major Expense Categories
Surface preparation is the most critical phase. You’ll need chemical cleaners like TSP substitutes or specialized deglossers to remove years of cooking oils. Abrasives are the next expense. You shouldn’t just grab one pack of sandpaper. A professional finish requires a progression of grits, typically starting at 120 for stripping and moving up to 320 or 400 for between-coat smoothing. High-quality sanding sponges are essential for reaching into the deep grooves of shaker or raised-panel doors.
The coating system represents the largest financial outlay. Cabinet paints are fundamentally different from wall paints because they require higher block resistance and hardness. By understanding paint composition, you can see why urethane alkyd enamels cost 45% more than standard acrylic latex. These products use specialized resins that cure to a factory-like finish. Finally, consumables like high-grade masking tape and pre-taped plastic ensure your appliances and flooring stay protected from overspray throughout the process.
Denver Climate Factors and Product Choice
Denver’s unique high-altitude environment directly impacts the materials cost for cabinet painting. The city’s average humidity often sits between 15% and 25%, which is significantly lower than coastal regions. This dry air causes water-based coatings to flash off, or dry, too quickly. If the paint dries before it has a chance to level out, you’ll see brush marks or a “pebbly” texture on the surface.
To combat this, many Denver homeowners must purchase paint extenders or retarders to increase “open time.” While big-box retailers carry basic supplies, sourcing from local Denver distributors like Guiry’s or specialized commercial paint branches ensures you get products formulated for the Mountain West. These premium coatings are designed to withstand the intense UV exposure and rapid temperature swings common in Colorado homes, preventing the finish from cracking or yellowing prematurely.
The Coating Budget: Primers and Professional Paints
The largest variable in your total materials cost for cabinet painting involves the liquid coatings. In 2026, the market has shifted toward high-performance hybrids that offer extreme durability. Industry leaders like Benjamin Moore Scuff-X and Sherwin-Williams Emerald Urethane Trim Enamel currently retail between $85 and $110 per gallon. While standard wall paint might cost $40, these specialized coatings contain higher solids and resin content. This ensures the finish can withstand thousands of door openings and frequent cleaning without softening or chipping.
For a standard 20-linear-foot kitchen, which typically includes 30 to 35 door and drawer faces, you should budget for two gallons of primer and two gallons of finish paint. This allows for the industry-standard application of two coats for each stage. If you are aiming for a factory-grade finish, 2026 trends favor Italian coatings like Renner or Ilva. These 2K (two-component) polyurethane products are the gold standard for water resistance and hardness. They often require a hardener or catalyst, pushing the price toward $120 per gallon, but they provide a surface that resists kitchen grease and oils for over a decade.
High-Performance Primers
The “Primer Tax” is a non-negotiable expense when calculating the materials cost for cabinet painting. You cannot use standard drywall primer on finished wood or laminate. Shellac-based primers, such as Zinsser BIN, cost approximately $75 per gallon and are essential for blocking “tannin bleed” in oak or cherry cabinets. Without this chemical barrier, yellow or brown spots will migrate through your topcoat within weeks. Water-borne bonding primers like Insl-X Stix, priced near $65 per gallon, offer better flexibility for laminate surfaces. Choosing the wrong primer often leads to total film failure, making this the most critical investment in your budget.
The Topcoat: Urethane Alkyd vs. Acrylic
Modern urethane alkyd enamels provide the leveling properties of old-fashioned oil paint with the easy cleanup of water. This technology prevents brush marks from showing, which is vital for a professional look. Because these paints are formulated to be harder than standard latex, they carry a premium price tag. When handling these chemicals, it is vital to follow safety and preparation supplies protocols to ensure proper ventilation and skin protection. Most homeowners find that spending $200 on premium topcoats saves thousands in future touch-ups. If you are unsure which coating fits your specific cabinet material, consulting with a professional for cabinet painting in Denver can help clarify the best product for your local climate and altitude.
The Hidden Expenses: Preparation and Masking Supplies
Homeowners often focus on the price of the gallon, but “sundries” usually account for 30% of the total materials cost for cabinet painting. You aren’t just buying paint; you’re investing in a controlled environment. Achieving a factory-grade finish requires total room containment. This involves Zip-wall systems to isolate the kitchen from the rest of the house, heavy-duty floor protection like Ram Board, and high-efficiency ventilation filters to catch airborne overspray. These items are consumables. Once the job is done, they go in the trash, but they’re the only reason your home doesn’t end up covered in a fine layer of dust.
Caulk and wood filler represent another critical area where quality dictates the lifespan of the project. Cheap latex caulk often shrinks or cracks within six months of application. Professional painters in 2026 favor high-solids, elastomeric caulks that move with the wood as it expands and contracts. Similarly, choosing a premium wood filler is vital for high-use areas like drawer fronts. These products must be easy to sand yet hard enough to withstand daily impact without denting or popping out of the wood grain. If you ignore these small details, the most expensive paint in the world won’t hide the structural flaws underneath.
Without proper containment and high-quality preparation products, the cleanup costs or repair needs can easily exceed the initial savings of a DIY approach. Every roll of tape and every filter serves a specific purpose in maintaining the integrity of the coating. These hidden expenses are what separate a “painted cabinet” from a “refinished cabinet” that looks new for a decade.
Abrasives and Sanding Systems
Professional results require at least three sanding stages: 120-grit for scuffing, 220-grit for smoothing, and 320-grit for the final buff. Specialized sanding sponges are essential for reaching into the detailed profiles of shaker or raised-panel doors. If you’re working with oak, you’ll need high-quality wood fillers to level the deep grain. Finally, tack cloths are a mandatory expense. These sticky rags remove microscopic debris that would otherwise cause bumps in your finish.
Masking and Protection
Cheap tape leads to paint bleed and adhesive residue. Investing in premium delicate-surface tape ensures crisp lines without damaging existing wall finishes. You’ll also need a high volume of plastic sheeting to protect appliances, ceilings, and countertops from drifting spray. Don’t forget safety gear. A reusable respirator with P100 organic vapor cartridges and a box of nitrile gloves are essential parts of the budget to protect your health.
Equipment Costs: Application Tools and Sprayers
The total materials cost for cabinet painting shifts dramatically based on your choice between manual tools and mechanical sprayers. While a high quality brush and roller setup might cost $80 to $120, a professional grade spraying system can easily exceed $1,500. Your decision impacts more than your budget; it determines the final texture and durability of your kitchen’s new look. The specific paint for cabinets you select dictates the equipment you must use. High viscosity coatings often require larger tip sizes and higher pressure to atomize correctly.
Spraying Systems (HVLP vs. Airless)
Entry level DIY sprayers typically retail between $150 and $300. These units work for small projects but often struggle with the thick resins found in 2026 cabinet coatings. Contractor grade High Volume Low Pressure (HVLP) units provide a factory like finish but require a larger investment. Beyond the unit price, you must budget for consumables. Fine finish tips cost between $35 and $65 each, while manifold filters add another $15 per swap. Beginners should expect a 15% material waste factor during the “dialing in” process as they calibrate pressure and fan patterns.
Brushes and Rollers for Trim Work
Don’t settle for a $5 multipack of brushes. A $25 professional angled sash brush is a mandatory investment for clean lines. High end brushes hold more material and resist shedding, which prevents stray bristles from ruining your finish. For flat surfaces, microfiber rollers are the standard for 2026 DIY projects. However, mohair rollers are superior for high gloss urethanes because they minimize the “stipple” or orange peel effect. You’ll also need cleaning supplies like specialized brush combs and mineral spirits, which currently cost approximately $18 per gallon.
Deciding between renting or buying depends on your future plans. A mid-range HVLP system rental costs roughly $110 per day. If your project spans more than four days, purchasing a $500 homeowner grade unit is more cost effective. Remember that ownership comes with the responsibility of meticulous cleaning. A single teaspoon of dried paint in a fluid needle can render a $200 spray gun useless. If you want to avoid the steep materials cost for cabinet painting and the technical headaches of sprayer maintenance, hiring a pro is often the more economical choice long term.
Ready to skip the equipment rental fees and technical learning curve? Get a professional finish by contacting Cabinet Painting Denver for a detailed quote today.
The Final Tally: DIY Material Total vs. Professional Service
Calculating the total materials cost for cabinet painting requires more than just looking at the price tag on a gallon of paint. For a standard Denver kitchen with 25 to 30 cabinet openings, your 2026 budget must account for every consumable item from high-grit sandpaper to industrial-grade primers. While a DIY approach seems cheaper on paper, the hidden costs of inefficiency often narrow the gap between doing it yourself and hiring an expert. Most homeowners find that their initial estimate grows by 15% to 20% once they account for the “waste factor” associated with trial-and-error application techniques.
Estimating Your Total Supply Bill
In 2026, a low-end material budget for a small kitchen starts around $450. This covers basic water-based paints and standard brushes. A high-end budget for a professional-grade finish often exceeds $1,100. This increase is driven by a 12% rise in petroleum-based product costs over the last two years. You should always include a 15% “oops” margin in your budget. This extra cash covers accidental spills or the need for a third gallon of paint to ensure you have enough for future touch-ups. Without this buffer, a single mistake can stall your project for days while you wait for more supplies to arrive.
Why Professional Labor Saves Material Waste
Professional painters achieve a level of efficiency that’s difficult to replicate at home. Industry data shows that DIYers typically waste 18% of their liquid materials through over-application or improper storage. Professionals use 100% of the product because they understand the exact spread rate of high-performance coatings. If you are considering cabinet refinishing, remember that pros also have access to trade pricing. They often save 20% on premium paints through commercial accounts, a discount they can pass on to you through more competitive project bids.
The value of a professional service also includes a long-term warranty. If your $600 worth of materials starts peeling after six months due to a prep error, your entire investment is lost. A Denver expert provides a guarantee that protects your budget. Consider these final factors when deciding your path:
- Skill Level: Do you have 40+ hours to dedicate to meticulous cleaning and sanding?
- Tool Access: Do you own a high-volume, low-pressure (HVLP) sprayer, or will you need to rent one for $100 per day?
- Durability: Professional coatings are often catalyzed, meaning they cure harder and last 5 to 7 years longer than standard retail paints.
If your goal is a showroom-quality finish that withstands the high-altitude Denver climate, the materials cost for cabinet painting is better spent as part of a professional package. While DIY is possible for small guest baths, the complexity of a full kitchen usually warrants the precision and bulk-buying power of a local specialist.
Maximize Your Kitchen Investment in 2026
Navigating the materials cost for cabinet painting involves more than just picking a color. You’ve learned that high-performance primers and industrial coatings represent the largest portion of your budget. Preparation supplies like 3M masking film and professional-grade sandpaper typically consume 20 percent of your total supply spend. While DIY kits might seem affordable, achieving a factory-smooth finish requires specialized HVLP sprayers that often cost over $500 to purchase or $100 per day to rent at local equipment hubs.
Our team has spent years perfecting the art of the durable finish. Since 2012, we’ve served the Denver Metro area with 5-star rated service and transparent, no-hidden-fee pricing. We utilize industrial-strength coatings that aren’t available in retail stores, ensuring your kitchen withstands daily wear for years. You don’t have to tackle the mess or the complex math of a renovation alone.
Get a Free, All-Inclusive Cabinet Painting Quote in Denver
Your dream kitchen is closer than it looks. Start your home’s transformation today and enjoy a space that feels brand new for a fraction of the cost of a full replacement.
Frequently Asked Questions
Is it cheaper to paint or replace kitchen cabinets in 2026?
Painting is significantly cheaper than replacement, typically costing 20% to 30% of the total price of new cabinetry. According to 2025 industry reports, a full kitchen replacement averages $25,000, while professional painting stays well below that mark. You save on the materials cost for cabinet painting because you aren’t paying for new wood or structural installation. It’s a sustainable way to update your kitchen layout without the heavy construction waste.
How much paint do I actually need for 20 cabinet doors?
You’ll typically need two gallons of paint to cover 20 cabinet doors and their corresponding face frames. One gallon of high quality cabinet enamel covers approximately 350 to 400 square feet. Since you need two coats for durability, buying two gallons ensures you have enough for touch-ups. This estimate accounts for the surface area of standard 24 inch by 30 inch doors and helps you avoid multiple trips to the supply store.
What is the most expensive part of cabinet painting materials?
The specialized architectural coatings, specifically the bonding primer and urethane alkyd enamel, represent the highest materials cost for cabinet painting. These professional grade products often cost 50% more than standard wall paint. You’re paying for chemical resistance and hardness ratings that prevent chipping. Investing in these premium liquids ensures the finish lasts for 10 years rather than peeling within 12 months under heavy use.
Can I use regular latex paint on cabinets to save money?
You shouldn’t use regular latex paint because it lacks the block resistance needed for high touch surfaces. Latex remains flexible and soft, which causes doors to stick to frames and eventually peel away. Industry tests show that standard latex fails under kitchen grease and heat within 180 days. Instead, use a waterborne alkyd or a polyurethane coating designed specifically for cabinetry to ensure your hard work doesn’t go to waste.
Do I really need to buy a sprayer for a professional look?
You need an HVLP or airless sprayer if you want a smooth, factory like finish without brush marks. While a high density foam roller can provide decent results, 85% of professional contractors in Denver use sprayers to achieve a level surface. Sprayers also allow you to apply thinner, more even coats. If you’re doing it yourself, renting a professional sprayer for $75 a day is a smart alternative to buying one.
What specific brands of paint do Denver professionals use?
Denver professionals frequently use Benjamin Moore Scuff-X or Sherwin-Williams Emerald Urethane Trim Enamel for residential projects. For high end custom shops, Italian coatings like Renner or Milesi are the gold standard. These brands are preferred because they handle the low humidity in Colorado without drying too quickly. Local pros choose these products to ensure the finish doesn’t crack during the 40% humidity shifts common in Denver winters.
How much should I budget for sandpaper and tape alone?
Budget approximately $150 to $200 for high quality abrasives and masking supplies in a standard 20-door kitchen. You’ll need at least 10 rolls of 3M ScotchBlue or FrogTape to protect your counters and floors properly. For sandpaper, professionals recommend buying 10-packs of 120, 180, and 220 grit discs to ensure a smooth substrate. These consumables represent a small but vital portion of your total project expenses.
Does the color of the paint affect the materials cost?
Color affects your budget because deep pigments and certain high-hide whites require more coats or specific tinted primers. If you choose a trendy navy or charcoal, you might need three coats instead of two to achieve full opacity. This increases your total paint volume by 33%. Some premium colorants also carry a $5 to $10 surcharge per gallon depending on the specific brand’s pricing structure and pigment density.


